
Map Columns is one of the ways Freightools AI Studio can load a supplier's rate sheet. You tell the studio which column fills each agreement field, and it reads every row of your sheet that way.
No buying agreements are created in Freightools until you press Create.
When to choose Map Columns
| Map Columns | The AI Studio method | |
|---|---|---|
| File types | .xlsx only | Excel, CSV, PDF, Word, email, text, pasted text |
| Best for | One clean table with a heading row, on one sheet | Anything else: rates spread over several sheets or sections, or set out as a document |
| Fix with AI on the review screen | Not available | Available |
Before you start
- On the Supplier step, leave Direction on Buying. Map Columns loads supplier rates.
- Put all the rates in one table with a single heading row, on one sheet. Other sheets are not loaded.
- Give every column you use a heading.
- Delete any note, total or spacer rows underneath your table.
- Keep the file at 30 MB or less. A file over that, or a workbook too big to map column by column, is refused with a message: split it by trade lane and load the parts one after the other, or use the AI Studio method.
- Set up the checklist first: each price column fills a checklist charge, and you can't add a charge from the mapping screen, so add any that are missing now. See Choose the charges to load (the checklist).
Start a Map Columns load
- On the studio home, click the Map Columns card under Know what you want? Pick a method. The load questions open with Map Columns already chosen.
- Answer the Supplier, Load, Move part and Checklist steps. See Set up a load: supplier, service and route.
- On Give us the file., attach your
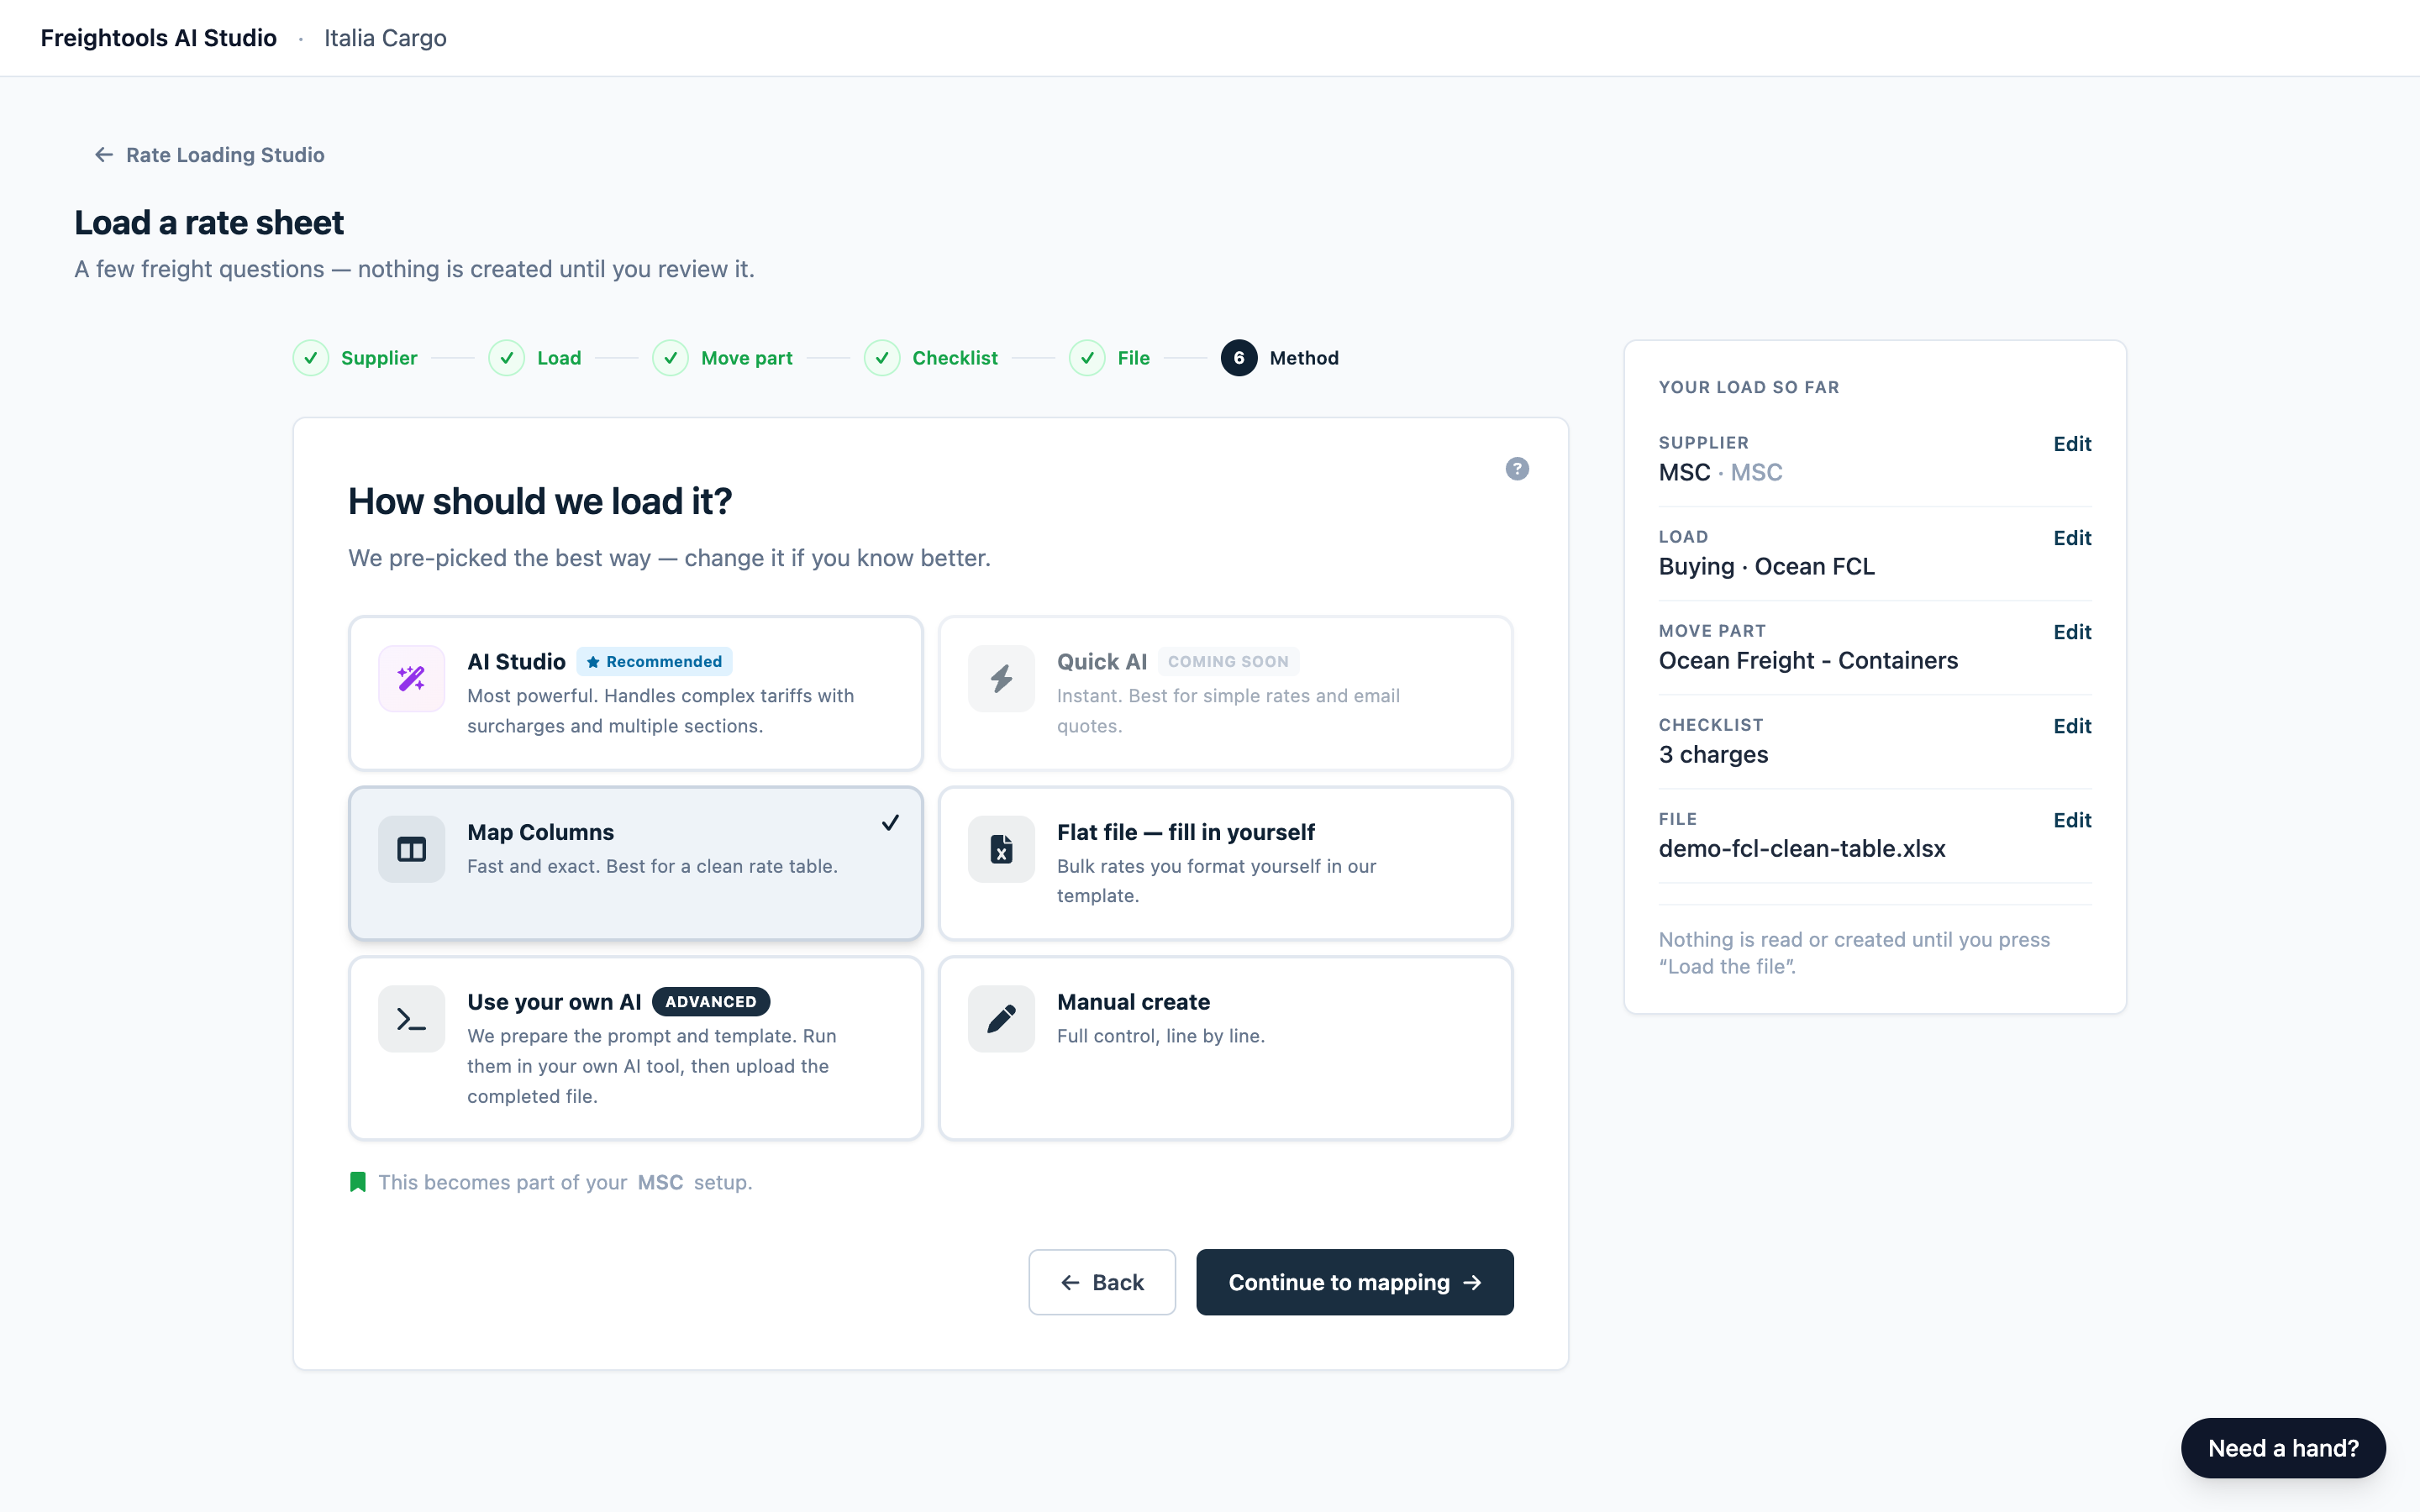
.xlsxfile and click Continue. - On How should we load it?, click the Map Columns card if it isn't already selected. A check mark appears in its corner.
- Click Continue to mapping. After "Reading your file’s columns…", the Map Columns screen opens.
Start the load with Run with this mapping at the bottom of the mapping screen. Nothing is written to Freightools until you click it.
Confirm the sheet and the header row
Section 1 · Header row shows the top of the sheet, with the heading row it found marked HEADER.
- If sheet names appear next to the section title, the highlighted one is the sheet that will be loaded. Click another name to load that one instead.
- Read "We detected your headers in row …". If that's wrong, click the correct row in the preview. If your heading row isn't in the preview at all, remove the rows above your table in Excel and attach the file again.
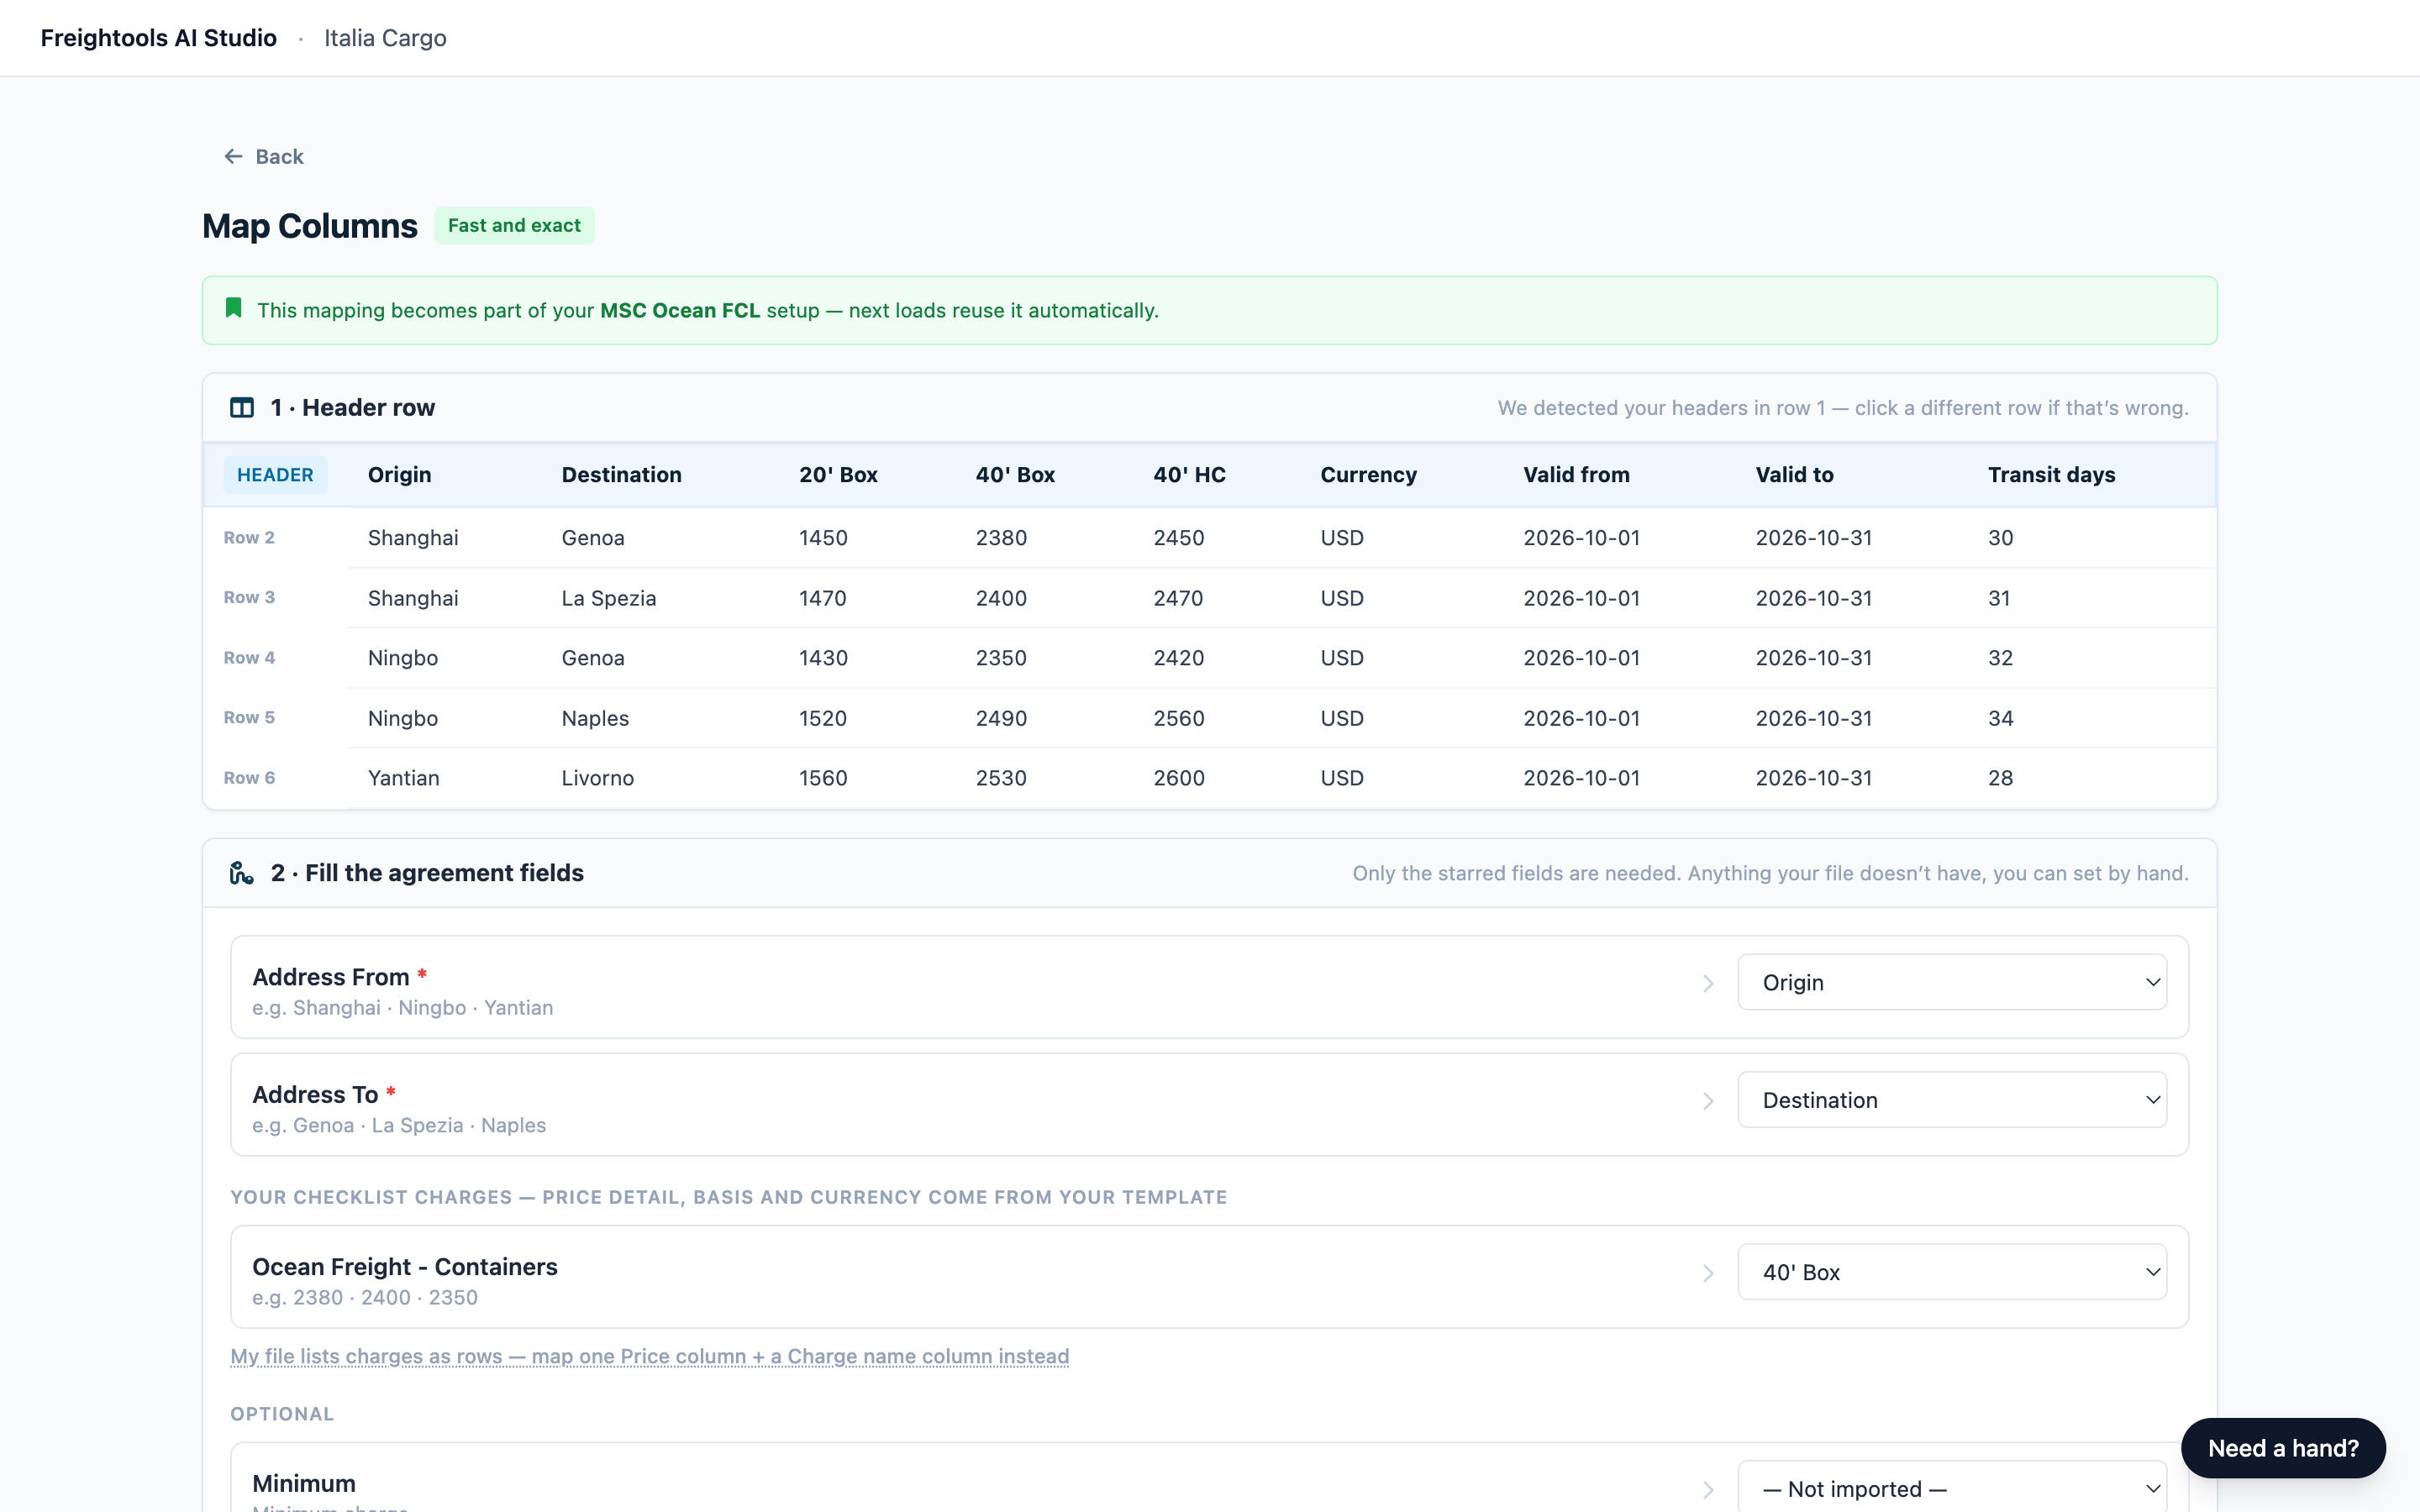
Important: Do this first. Clicking another header row or any sheet name, or going Back, throws away every answer on the screen, including values you set by hand. Back returns you to the load questions with your file still attached, and the mapping screen starts empty when you come forward again.
Fill the agreement fields
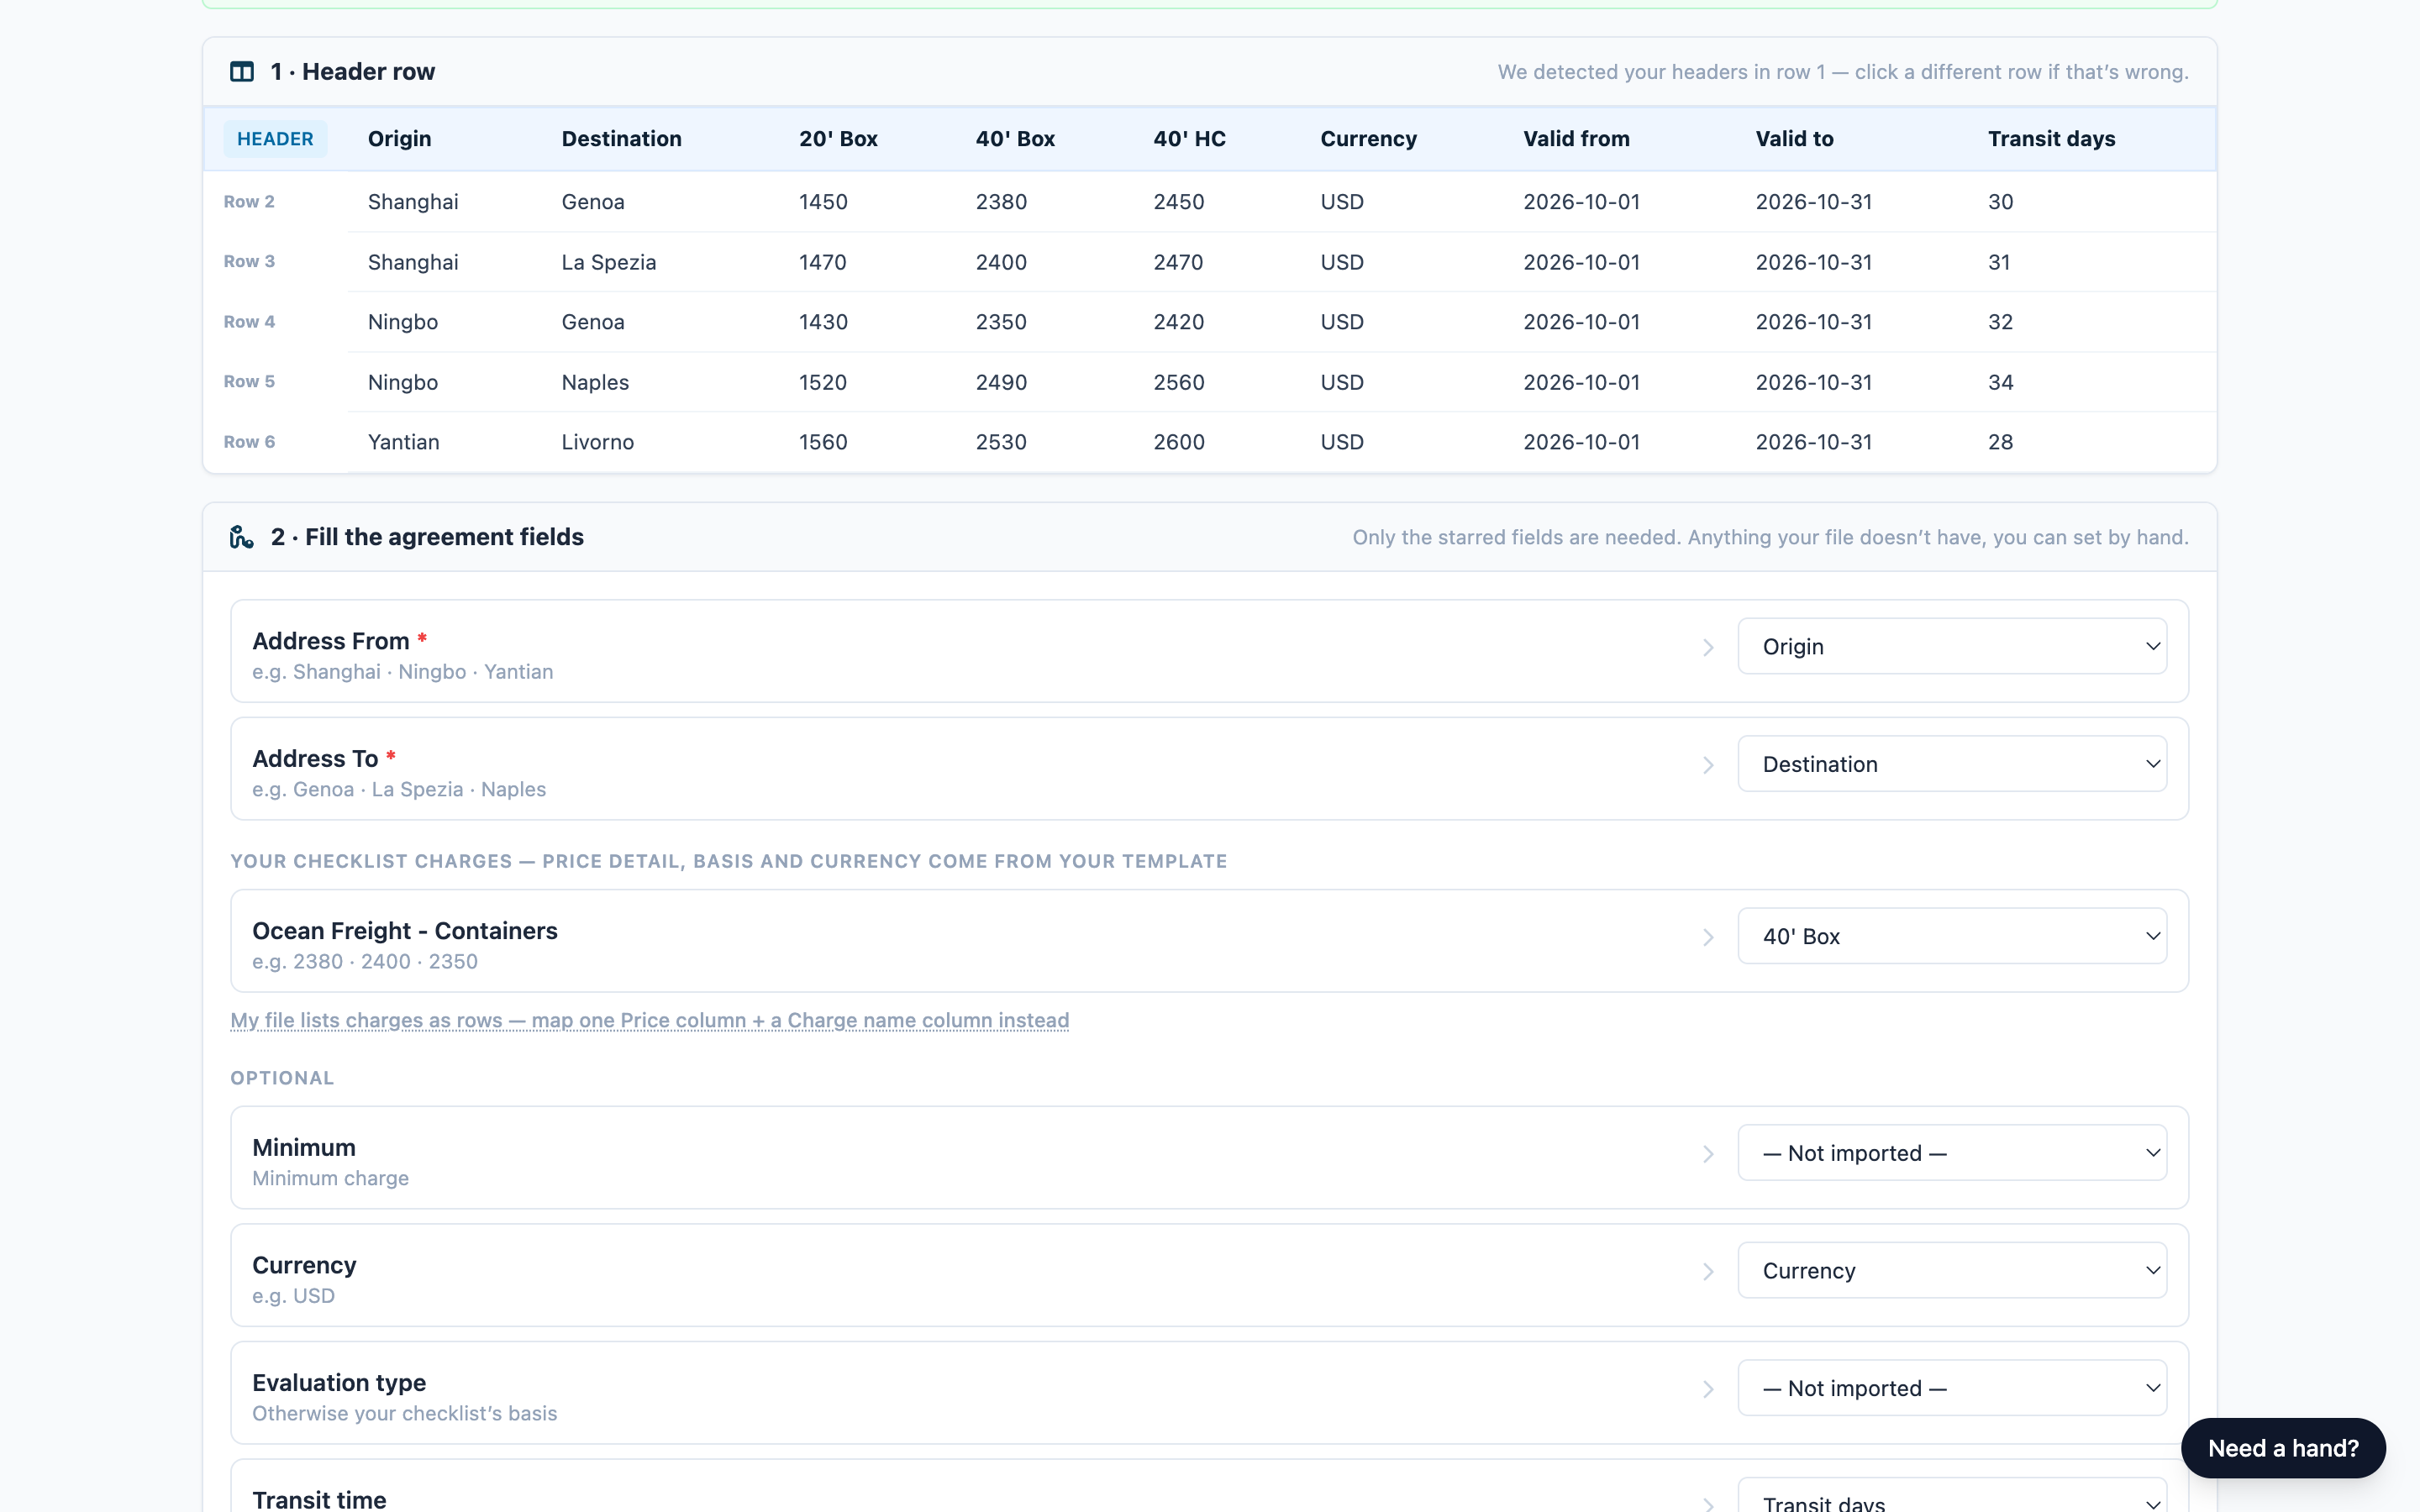
In section 2 · Fill the agreement fields, choose a column for each field (sample values then show under its name), Set manually… (some fields), or — Not imported —.
Some fields arrive already filled in. Those are suggestions, not your choices: open every dropdown and check the column and its sample values before you continue. A wrong suggestion loads without any warning.
Starred fields are required: Address From, Address To and a price. Empty ones show "Needs a column or a value", though Price can only come from a column.
Map the prices
Important: If the same charge is on your checklist more than once for different units — the same charge for two container sizes, say — Map Columns can't fill them separately. Check the Checklist step before you attach the file, and load that file with the AI Studio method instead.
If your file gives each charge its own price column (for example Ocean freight, BAF and THC side by side): under Your checklist charges, choose each charge's column. Charges left on — Not imported — aren't loaded. Columns you didn't use are listed under "Not used from your file": nothing needs every column, and it doesn't block the load.
If your file names the charge in one column and the amount in another:
- Click My file lists charges as rows — map one Price column + a Charge name column instead.
- Under Or — charges listed as rows in your file, set Price * to the amount column.
- Set Charge name to the column that names each charge. Section 2b · Match your charges to the checklist appears.
- In section 2b, choose a checklist charge for each name. Check the ones already picked; the rest start on — Skip this charge — and aren't loaded.
Rows for the same route come out as one lane carrying its charges. On the review screen, open a route you know and check that all of its charges are there at the right amounts before you press Create.
With exactly one checklist charge, Price alone is enough, and every row prices that charge.
Optional fields
| Field | How it's filled |
|---|---|
| Minimum, Transit time | A column only. |
| Currency | A column or Set manually…. Otherwise the checklist currency. |
| Evaluation type | Leave on — Not imported —. The unit comes from your checklist. |
| Validity date, Expiration date | A column or Set manually…. Otherwise the dates you gave on step 2 (Load). |
| Transshipment, Carrier | A column or Set manually…. |
Anything the studio can't read out of a column is left empty and shows on the review screen, where you can fix it.
Set a value by hand
Set manually… fills a field on every lane and shows "Set by you: …". Dates get a date box. For text, type into "Value used on every row". For ports (Address From, Address To, Transshipment):
- Choose Set manually…. A window such as Address From — choose the port(s) opens.
- Type at least two characters of a port name, city or code.
- Click each port to add it.
- Click Use this port (or Use these 2 ports). To change them later, click Change ports.
Pick several ports only when the supplier really quotes the same price from each one: as the window says, "every lane will carry them". Check how the lanes came out on the review screen before you press Create.
Check the locations
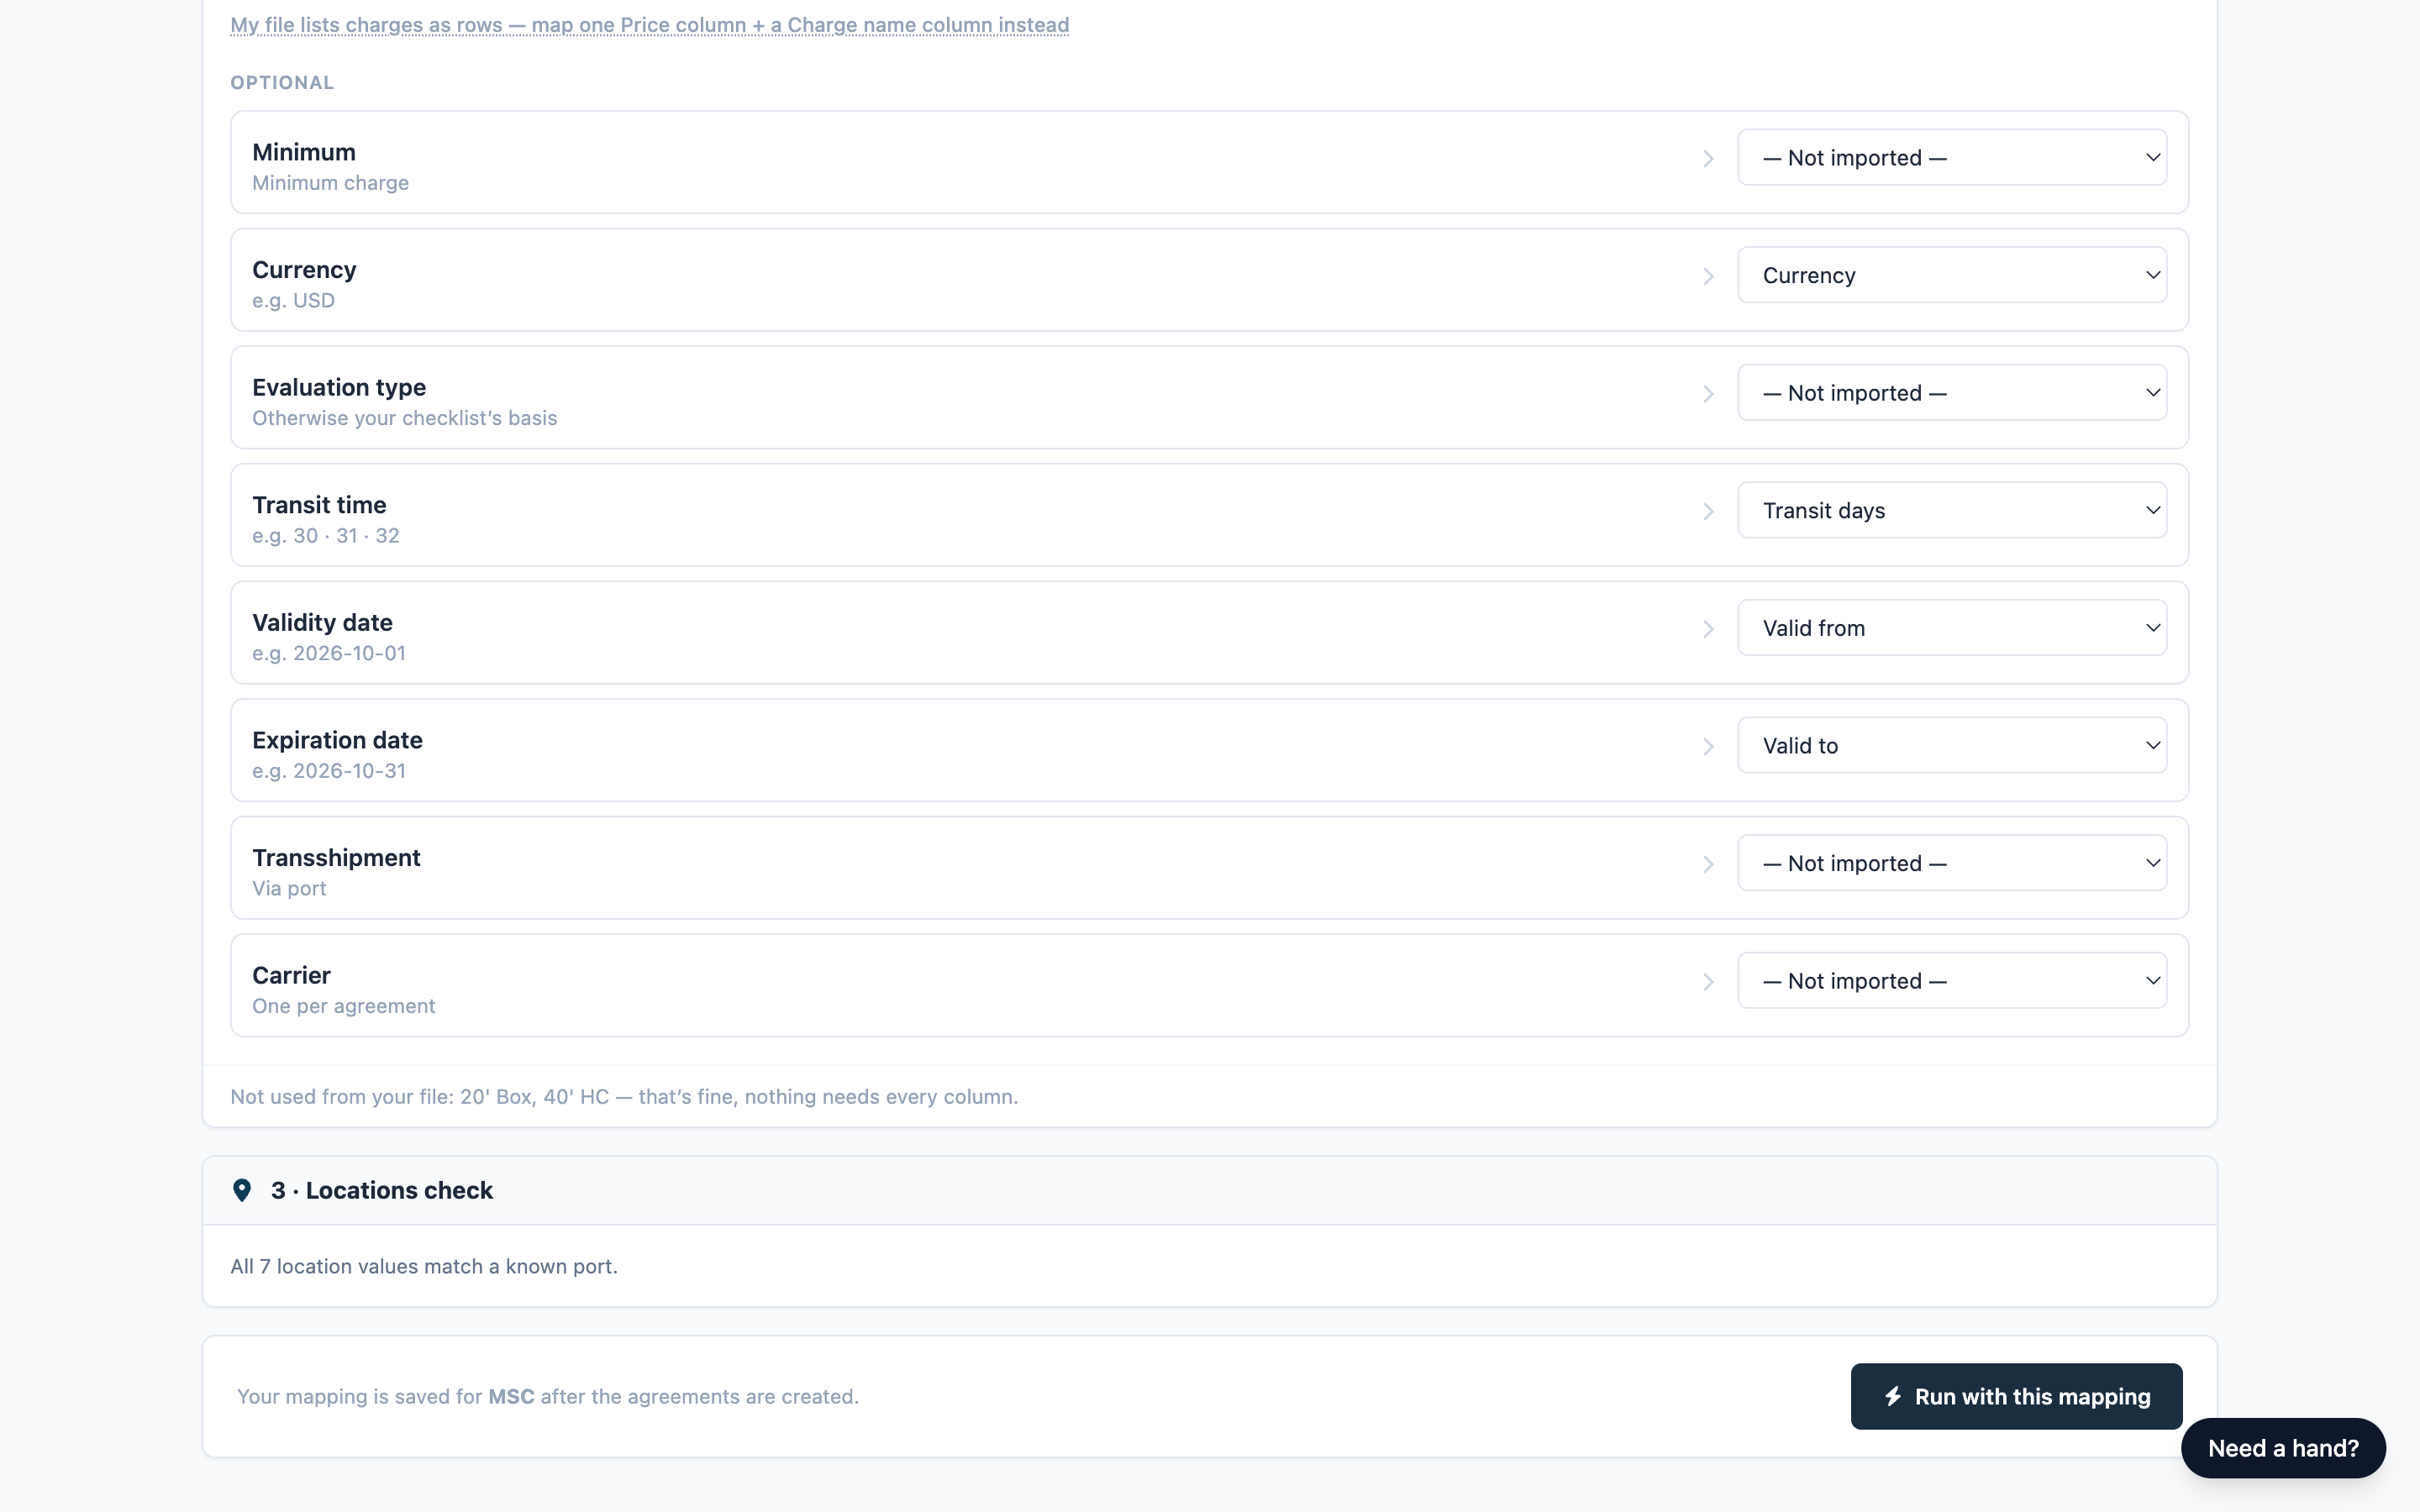
Section 3 · Locations check flags locations it doesn't recognize as "Address not found · …". A flagged location doesn't stop the load: run it and fix those lanes on the review screen, or correct the spelling in your file and attach it again. Anything unmatched after the run shows there too.
Start the load
- If something required is missing, the footer names it (for example "Address From needs a column or a manual value") and Run with this mapping stays grayed out.
- Click Run with this mapping. The button shows Starting… and the progress page opens. See Follow your load while it runs.
Warning: No buying agreements are created until you press Create on the review screen. Starting the load prepares an agreement template in your Freightools account for the studio to fill in — see Add your rate sheet and choose how to load it. A load that fails leaves that template empty: it holds no prices, so you don't need to delete it, and running the load again does no harm.
Review and create your agreements
The Review · Correct · Create screen opens with a Map Columns chip. Continue with Review your results and Create your agreements in Freightools.
You can't edit the mapping there. If the file was read wrongly, load it again with a new mapping: click Load new file on the supplier's saved configuration or, on a first load where you haven't created agreements yet, start a new load.
Load the supplier's next file with your saved mapping
On a first load, a green note says this mapping becomes part of your setup and next loads reuse it automatically. That happens when you start the next load with Load new file on the supplier's saved configuration — starting a brand-new load instead maps the columns from scratch. See Saved configurations and loading a new file for a supplier.
- On the studio home, find the supplier under Saved configurations (or click View all configurations) and click Load new file.
- On Give us the file., attach the new
.xlsxfile and click Continue. - Click Continue to mapping.
- If the file matches, a green strip "Reusing your saved mapping from …" appears and every answer is restored. The strip mentions Load with this mapping; the button is Run with this mapping.
- Check the form, especially the dates, then click Run with this mapping.
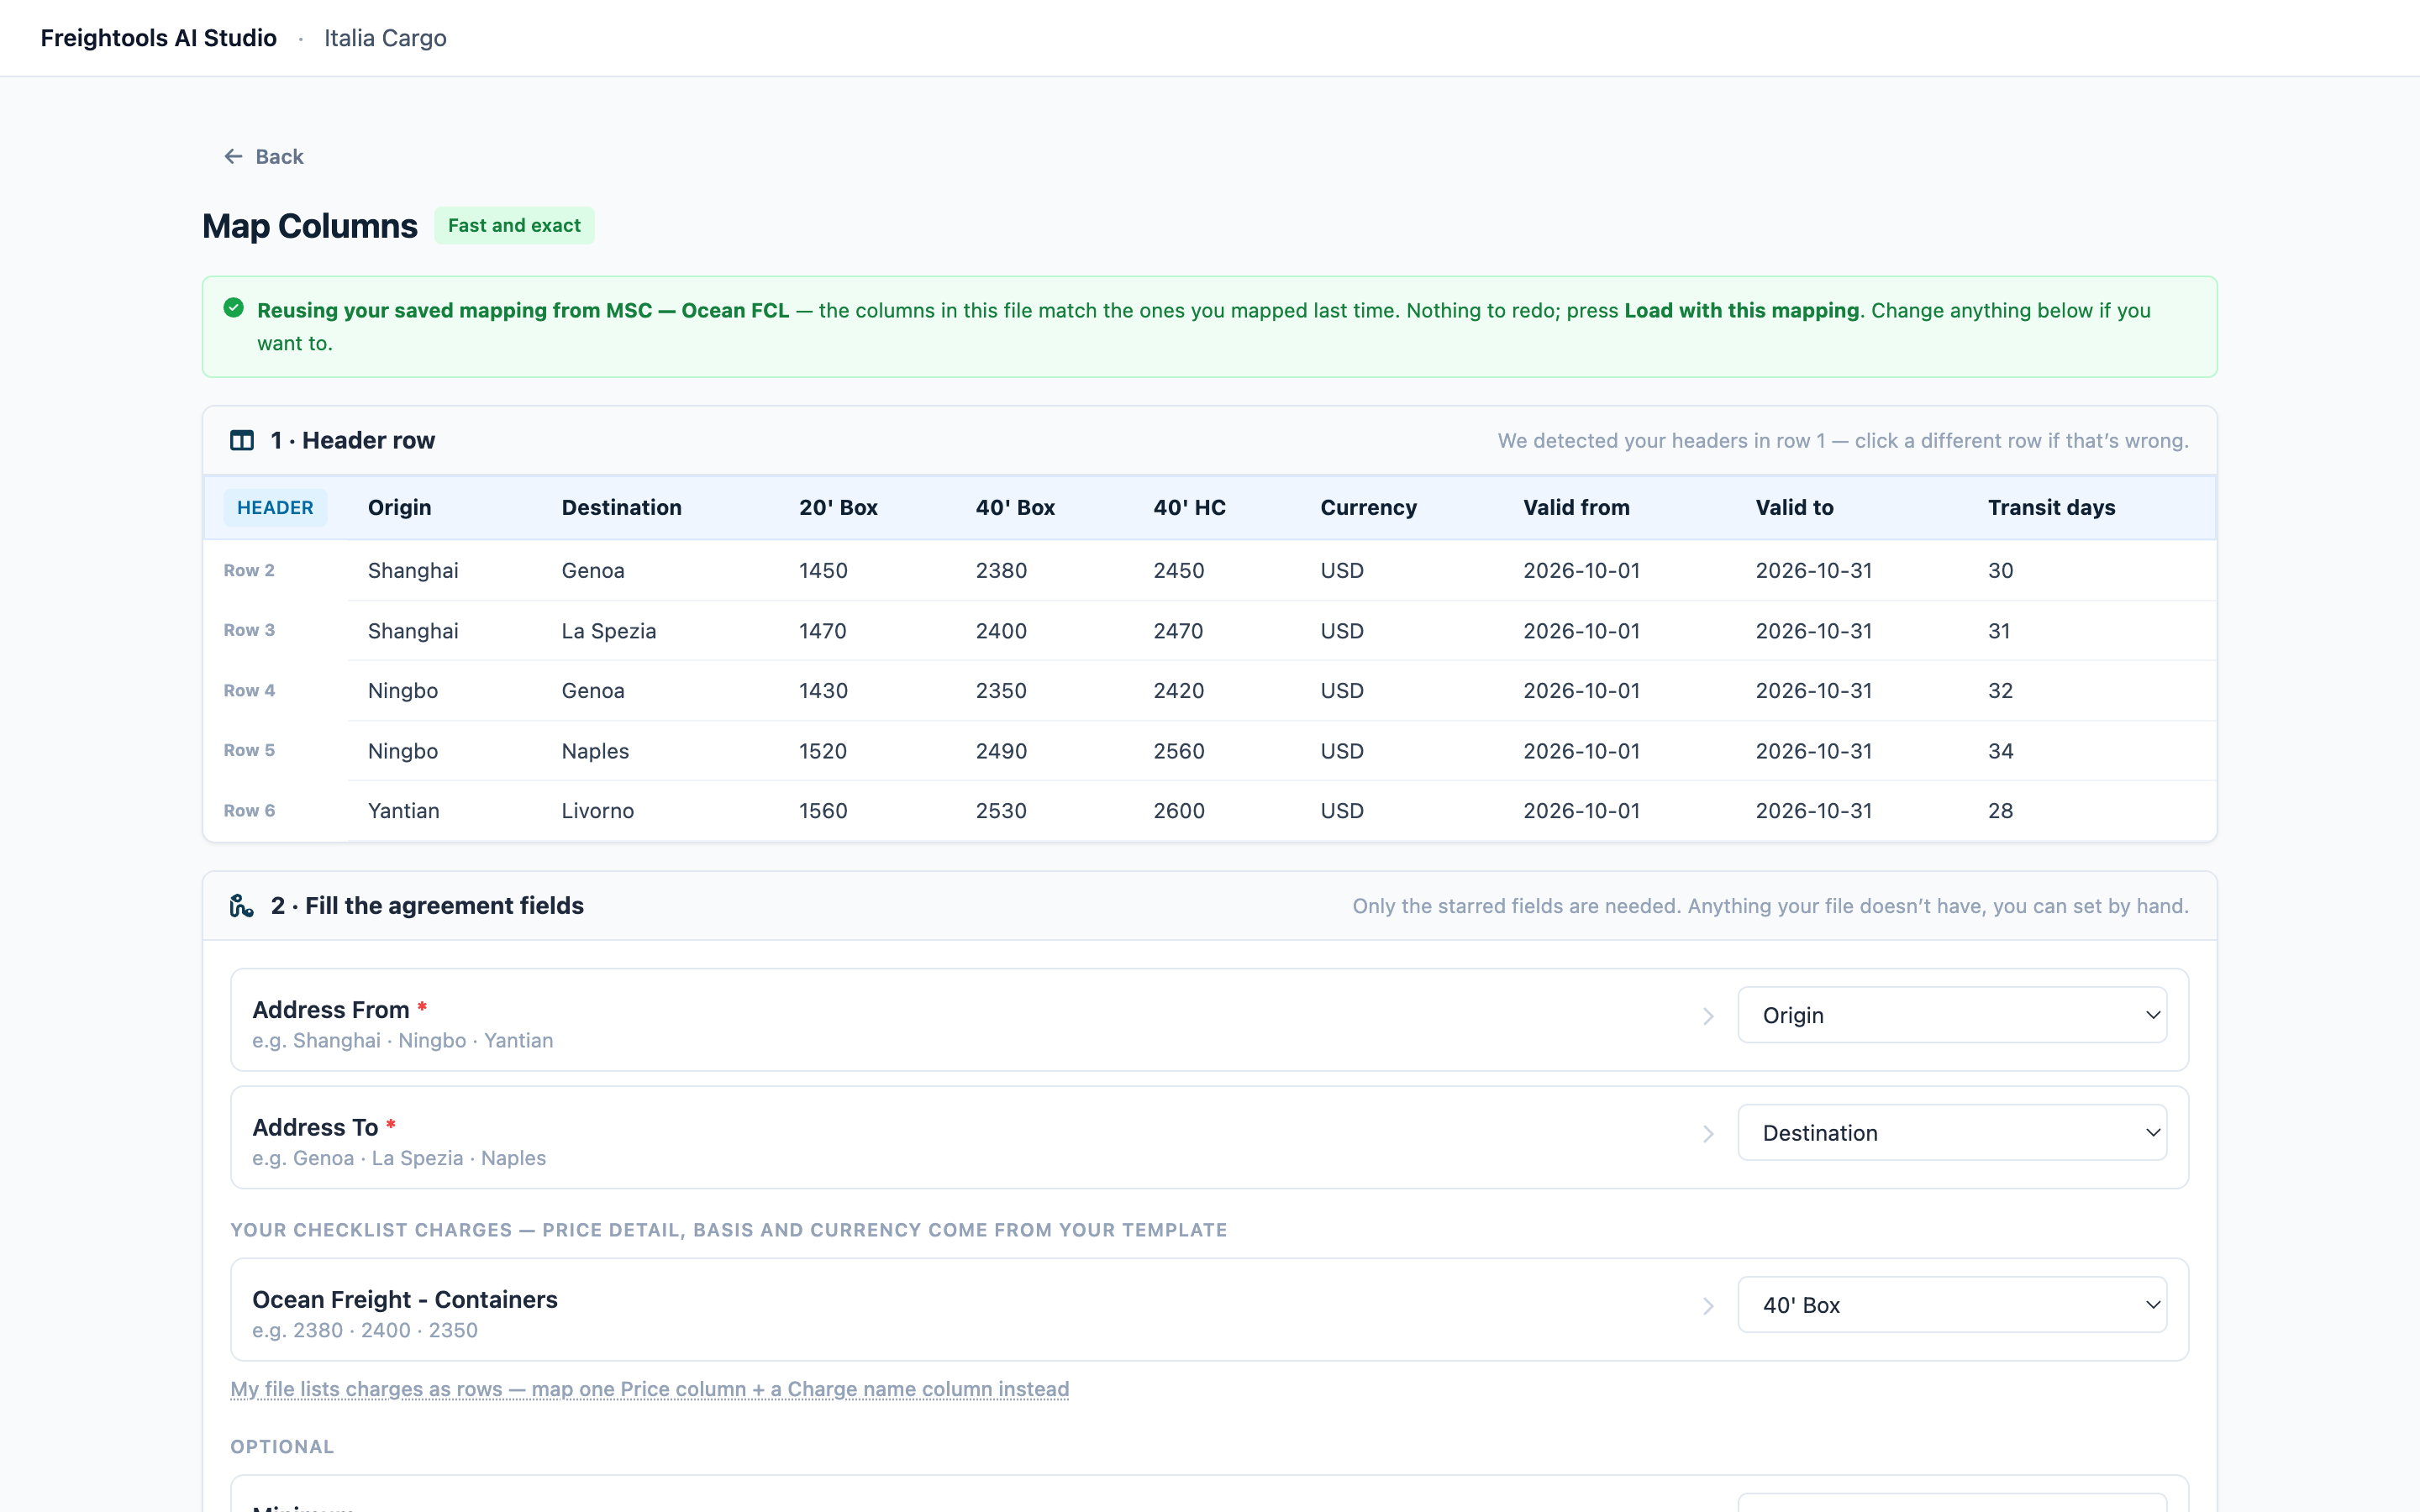
Important: Dates you set by hand last time come back unchanged, so update them. The dates on step 2 reset to today and one month ahead.
Note: Whatever is on the screen when you click Run with this mapping is kept for this supplier's next file.
If the new file doesn't line up with your saved mapping, an amber box says "This file doesn’t match your saved mapping, so we didn’t reuse it". The form then holds fresh suggestions, not your saved answers, so check every dropdown. To get reuse working again on later files, ask your supplier to keep the sheet the same from month to month.
Troubleshooting
| Symptom | What to do |
|---|---|
| The Map Columns card is grayed out | Map Columns needs an .xlsx file. Attach one, or use the AI Studio method. |
| "Map Columns reads .xlsx spreadsheets. For this file, use AI Studio instead." | Save the file as .xlsx and attach it again, or use the AI Studio method. |
| Some charges weren't loaded from a sheet that names its charges in a column | In section 2b, check for charges left on — Skip this charge — — those aren't loaded. A charge name that isn't listed there can't be mapped here; use the AI Studio method for that file. |
| The footer mentions an "unknown charge" | A charge on your mapping is no longer on your checklist. In section 2b, pick a current charge for that name, or choose each charge's price column again. |
| "That didn’t go through — nothing was created. Try again in a minute." | Wait and run again. If it repeats, click Back, check both dates on step 2 (Load), then map the columns again. If it still fails, contact support with the supplier name and the time you ran it. |
| The amber box appears on every new file | Check every dropdown and run each time. Reuse comes back once a file lines up with the mapping you last ran. |