
Everyone in your company who works in Freightools has their own user. A System Administrator adds new colleagues under Team Members in Settings, and Freightools emails each new colleague an invitation to activate their account.
This article covers creating the user, the fields of the New User window, and how the colleague activates their account. To change a user later, see How to edit a user's information. To change what a user can do, see How to edit a user's role. When someone leaves, see How to deactivate a user when an employee leaves.
Before you start
- You must be a System Administrator. Only users with the System Administrator access level can add or edit users.
- Have the colleague's email address ready. It is the address they sign in with, and it cannot be changed after the user is created.
- Know which office the colleague works in. Every user needs at least one office. Offices are managed on the Offices tab of the Company settings — see How to add and manage company offices.
Open Team Members
- Click your name or avatar in the top-right corner and choose Company Settings.
- In the left-hand menu, click Team Members.
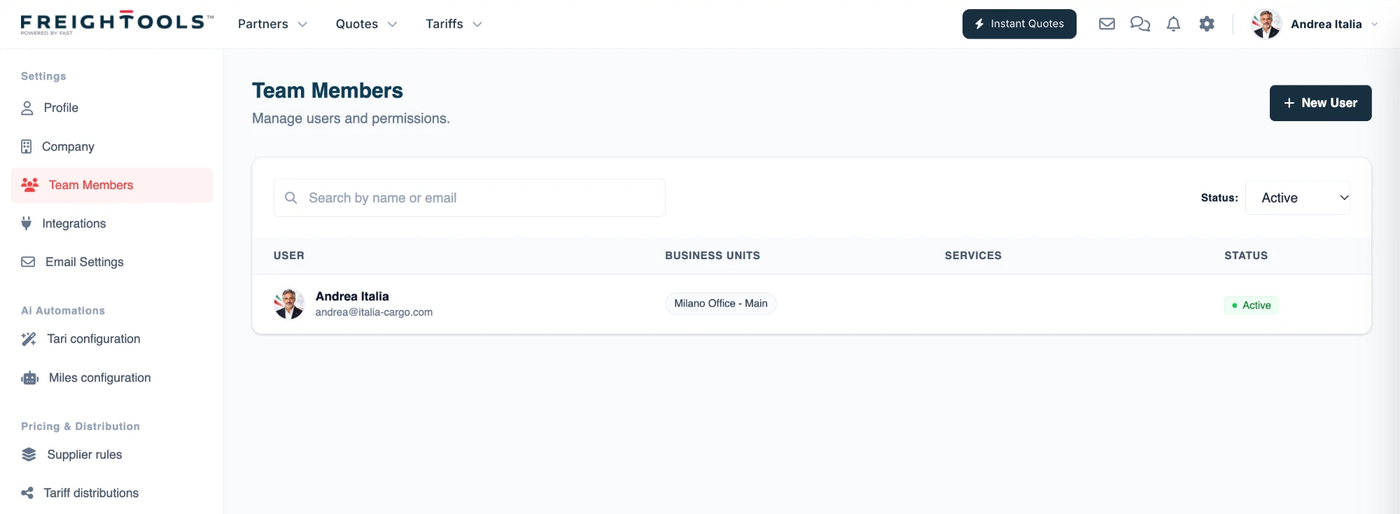
The list shows each user with their offices under Business Units, their Services and their Status. It opens on Active users. Use the Status filter to show Inactive or All users, and the search box to find someone by name or email.
Create the user
- Click New User at the top right. The New User window opens.
- To add a profile photo, click Change photo. The image can be up to 10 MB.
- Under Basic Information, enter the First Name, Last Name and Email. Display Name is greyed out; you do not fill it in.
- Under Organizational Assignment, choose one or more Offices. Service Mix is optional — see How to configure a service mix.
- Under Roles & Capabilities, choose the Global Access Level and tick the capabilities the colleague needs: Sales, Operations, Manager or Accounting. A new user starts as a Standard User with no capability ticked. How to edit a user's role explains each level and capability.
- Under Security & Account Status, leave Account enabled ticked, showing Active.
- Click Save Changes. Freightools shows "User saved successfully." and sends the colleague their invitation.
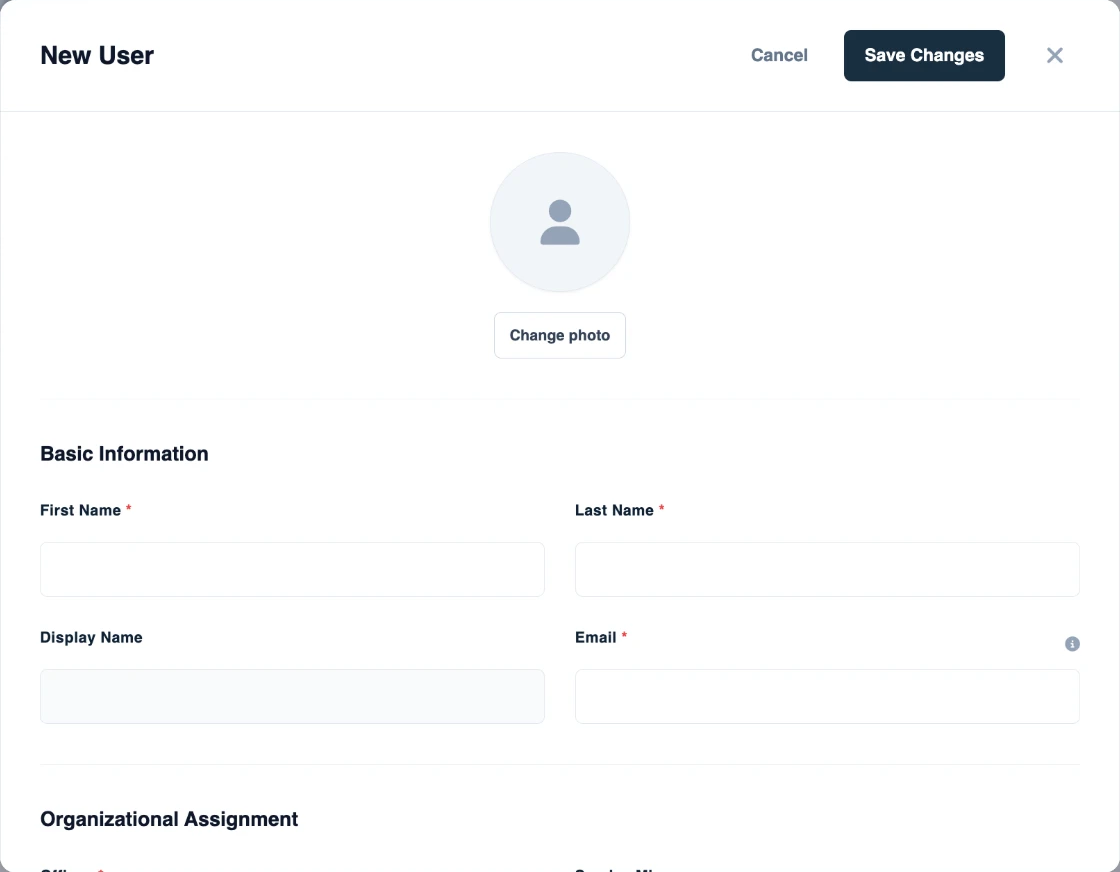
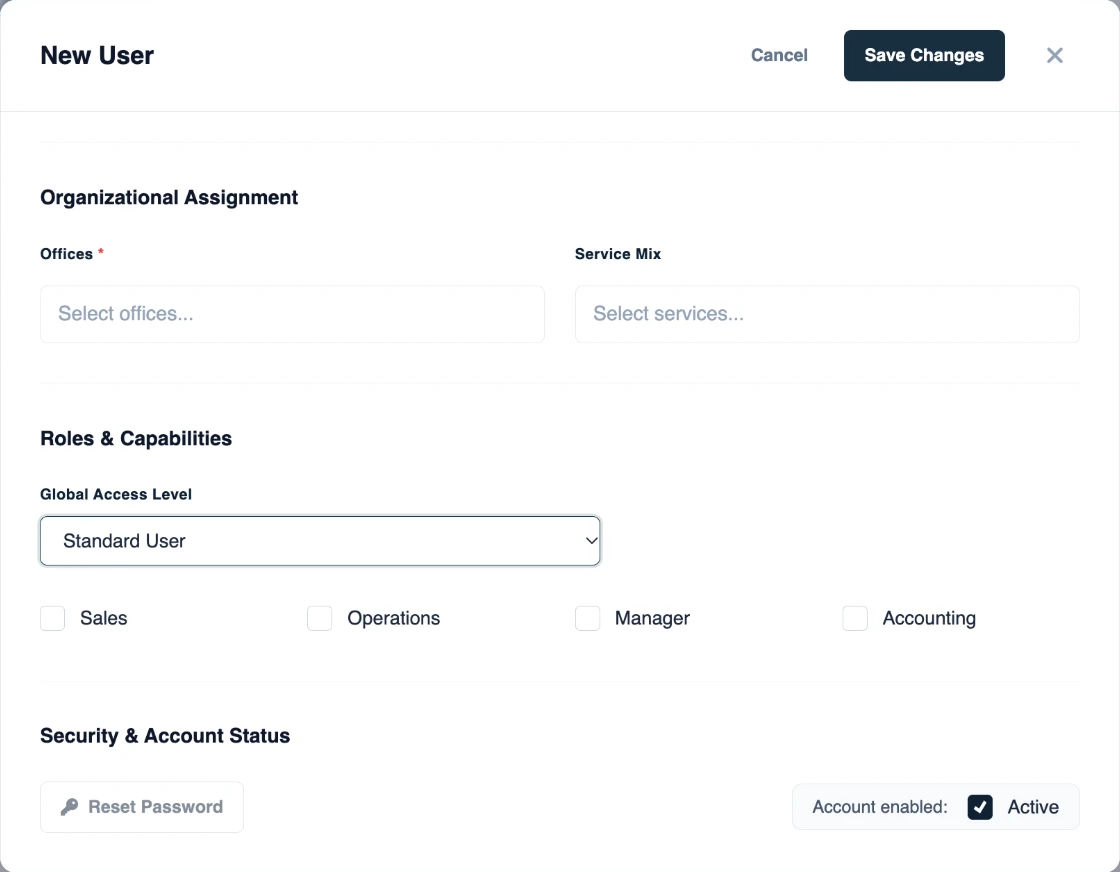
Fields marked with a red asterisk are required. If one is empty when you save, Freightools shows "Please fill in all required fields."
How the colleague activates their account
When you save the new user, Freightools emails the colleague an invitation to activate their account. The email says that their company administrator has invited them. The colleague:
- Clicks Activation in the email.
- Enters a password under Your Password and Confirm Your Password.
- Clicks Activate.
From then on, they sign in with their email address and that password.
If the colleague cannot find the email, ask them to check their spam folder. To send it again, open the user in Team Members by clicking their row, and click Resend Invitation. Freightools shows "Invitation sent successfully."
After the user is created
- Buying rates and margins. To limit which buying rates and margins the colleague can see, see How to set pricing permissions per user.
- Their mailbox. The colleague connects their own mailbox from their profile — see How to connect your email to Freightools.
If something goes wrong
| What you see | What to do |
|---|---|
| "Please fill in all required fields." | Fill in First Name, Last Name, Email and at least one office under Offices. |
| "Image size cannot exceed 10MB." | Choose a smaller photo. |
| "Failed to save user." | Check that no user already has this email address — set Status to All to include inactive users — then save again. |
| "Failed to send invitation." | Open the user and click Resend Invitation again. |
| The colleague did not receive the invitation | Ask them to check their spam folder, then click Resend Invitation. |
| You cannot add another user | Freightools can cap the number of users your company may have. Ask your Freightools contact. |
| You cannot open Team Members or save a user | Only a System Administrator can add users. Ask one in your company. |