
This article covers issuing a selling invoice to your customer for the charges on a shipment file: where you can start the invoice, which fields it needs, how the shipment's charge lines get onto it, and how you hand it over for approval. It does not cover supplier invoices — see How to register a buying invoice against a shipment — or what each status allows — see Understanding invoice statuses in Freightools.
The invoice window is called New Invoice while you create it and Edit Invoice once saved. Customer invoices are listed under Invoicing → Selling Invoices.
Before you start
- The customer must be approved for invoicing. See How to Approve a New Customer for Invoicing.
- The shipment must be saved. On a Shipping Order (SO), every tab except Basic Information stays disabled until the SO has been saved once, and that includes Economics and Process Steps. The same holds on a Customer Shipment (CS).
- The selling charges must be on the file. The invoice is built from the shipment's charge lines (in Freightools, "orders"). See How to read the economics of a Shipping Order and How to manage the economics of a Customer Shipment.
- Keep company exchange rates current. If Freightools finds no company rate for the invoice currency in the past seven days, a Confirm box opens as soon as the invoice window opens: "The system was unable to find the specified exchange rate in the past 7 days." Its buttons are Ok and Use System Exchange Rates: Ok closes the box and leaves Exchange Rate for you to type; Use System Exchange Rates fills it from the system rates. Company rates are kept under Settings → Accounting Configuration → Exchange Rates — see ROE (Rate of Exchange) in Freightools.
Start the invoice from the Shipping Order's Economics tab
- Open the SO and go to the Economics tab.
- Switch the lines grid from Buying to Selling. On Selling, the lines are grouped per customer.
- In the header of the customer's group, click Create Invoice. The button sits at the right of the group header and is shown only when the group has active orders.
- The Create Invoice dialog opens. Choose the Type, check Billing Customer (pre-filled with the group's customer) and Payment Term (pre-filled from the customer), and click Create. The new invoice opens in the Edit Invoice window with the group's charge lines on its Orders tab.
The same group header also has View Invoices, and a Credit button when the group has active credit orders. The Invoice column at the end of each line belongs to the same grid.
Note: The Split icon is disabled on a line that already has an invoice, so split a charge into payments before you invoice it.
Start the invoice from the shipment's Invoices dialog
Both the SO and the CS have an Invoices dialog that lists the invoices of the file and has an Add Invoice button, which opens a New Invoice window for the shipment's customer with the shipment's charge lines offered on its Orders tab. The dialog's columns are Edit, Number, Issued Date, Issued By, Currency, ROE, Value, Payment and Files.
You can open it in three places:
- On the SO, Process Steps tab: open the menu (the three-line icon) of the CS group and choose Invoices.
- On the CS, Process Steps tab: open the menu at the top right and choose Invoices.
- On the CS, Basic Information tab: next to Total Invoices, click the + button (tooltip Define New).
There is no Create Invoice or View Invoices button on the CS itself; on a CS you work through this dialog. See How to work with process steps on a shipment file.
Start the invoice from the Selling Invoices list
- Go to Invoicing → Selling Invoices and click New Invoice.
- Fill in the Basic Information tab (fields below) and click Save Changes.
- Add the charge lines on the Orders tab (see the next section).
The fields on Basic Information
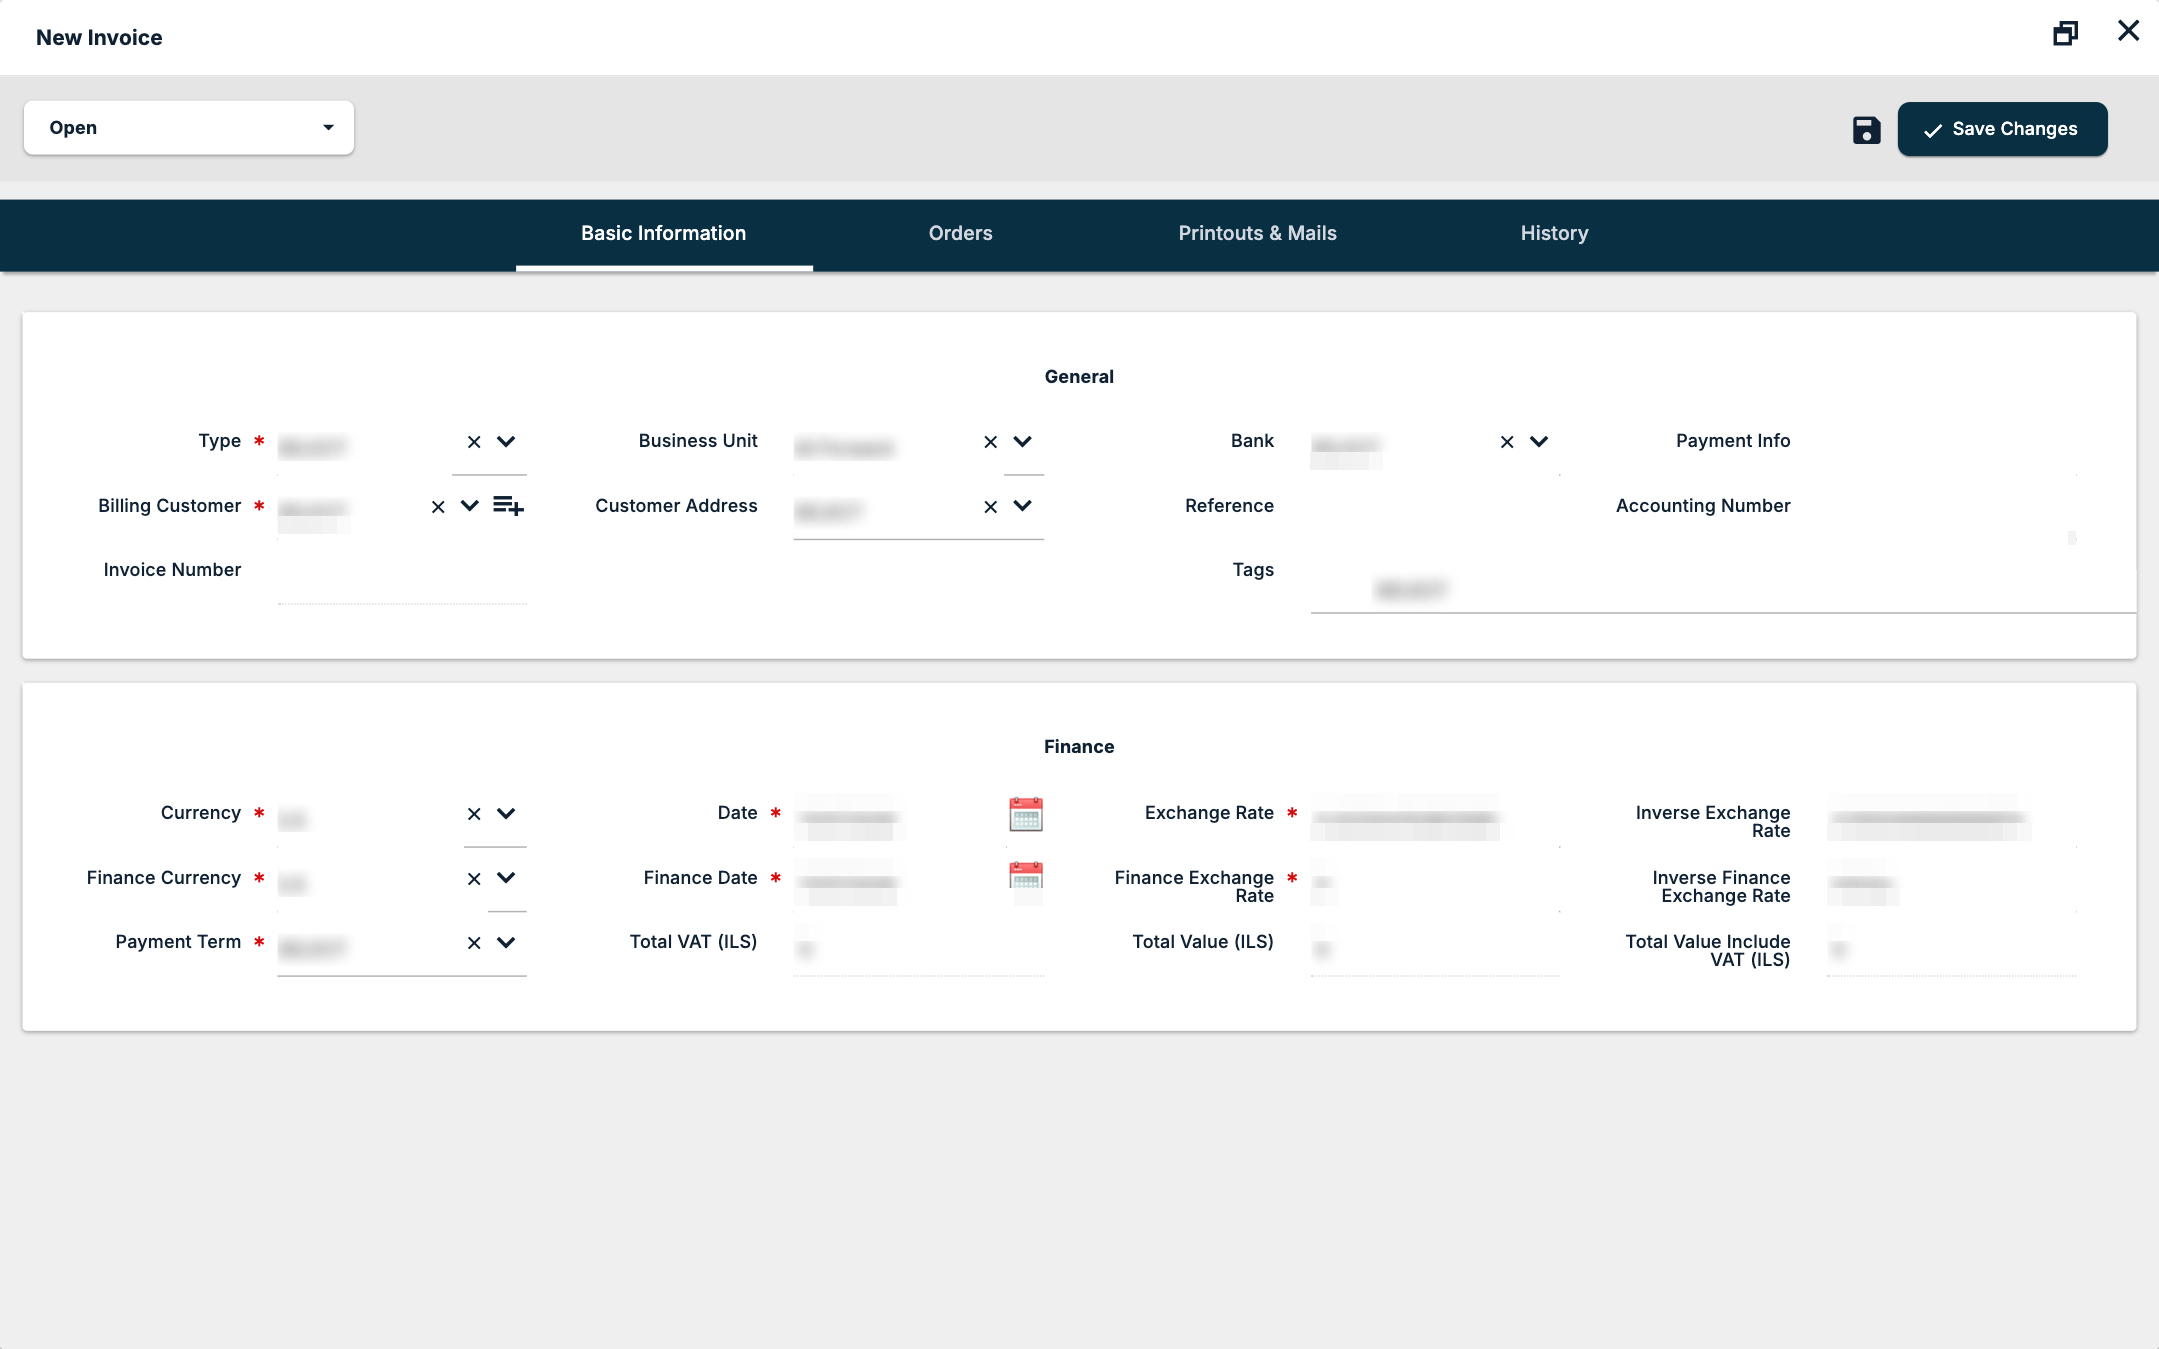
Fields marked with an asterisk on screen are required. If one is empty, Freightools shows "This field is required. Please fill it in."
General
| Field | What to enter |
|---|---|
| Type* | Selling Invoice, Credit Invoice, Demurrage invoice, Commercial Invoice or Credit Commercial invoice. Your company's types are set up under Invoice Types — see How to create invoice type in Freightools. |
| Business Unit | Pre-filled with your business unit. |
| Bank | One of your company's banks. |
| Payment Info | Free text. |
| Billing Customer* | The customer you are billing. |
| Customer Address | Pick one of the customer's addresses. The list is empty until a customer is chosen. |
| Reference, Accounting Number | Free text. |
| Invoice Number | Read-only. Freightools assigns it. |
| Tags | One or more of your company's tags. |
Finance
| Field | What to enter |
|---|---|
| Currency and Date | The invoice currency and date. Date starts at today. |
| Exchange Rate* and Inverse Exchange Rate | Exchange Rate is pre-filled. |
| Finance Currency, Finance Date and Finance Exchange Rate* | The finance side of the invoice. Finance Date starts at today; Finance Exchange Rate starts at 0, and Inverse Finance Exchange Rate reads "Infinity" until you enter it. |
| Payment Term* | One of your company's payment terms — see Setting Up Payment Terms in Freightools. |
| Total VAT, Total Value, Total Value Include VAT | Read-only totals, 0 until lines are added. The currency in brackets follows the invoice and finance currencies. |
Put the shipment's charges on the invoice
The Orders tab, like Printouts & Mails and History, is disabled until the invoice has been saved once. On a saved invoice it has the Add Order button, a Show available Orders tick box and a Select tick box on each line. These controls are shown only while the invoice is before Finance Approved — that is, in New, Open, Pending or Operation Approved.
Each line shows the charge (Activity, with its unit and quantity), the Shipping Order it comes from, a link to the CS, and the Original Value, Delta(Δ) Value, Unit Value, Total Value, Document Value, Value Inc. VAT and VAT Code. The VAT code on each line comes from your company's VAT code rules — see Setting Up VAT Code Rules in Freightools.
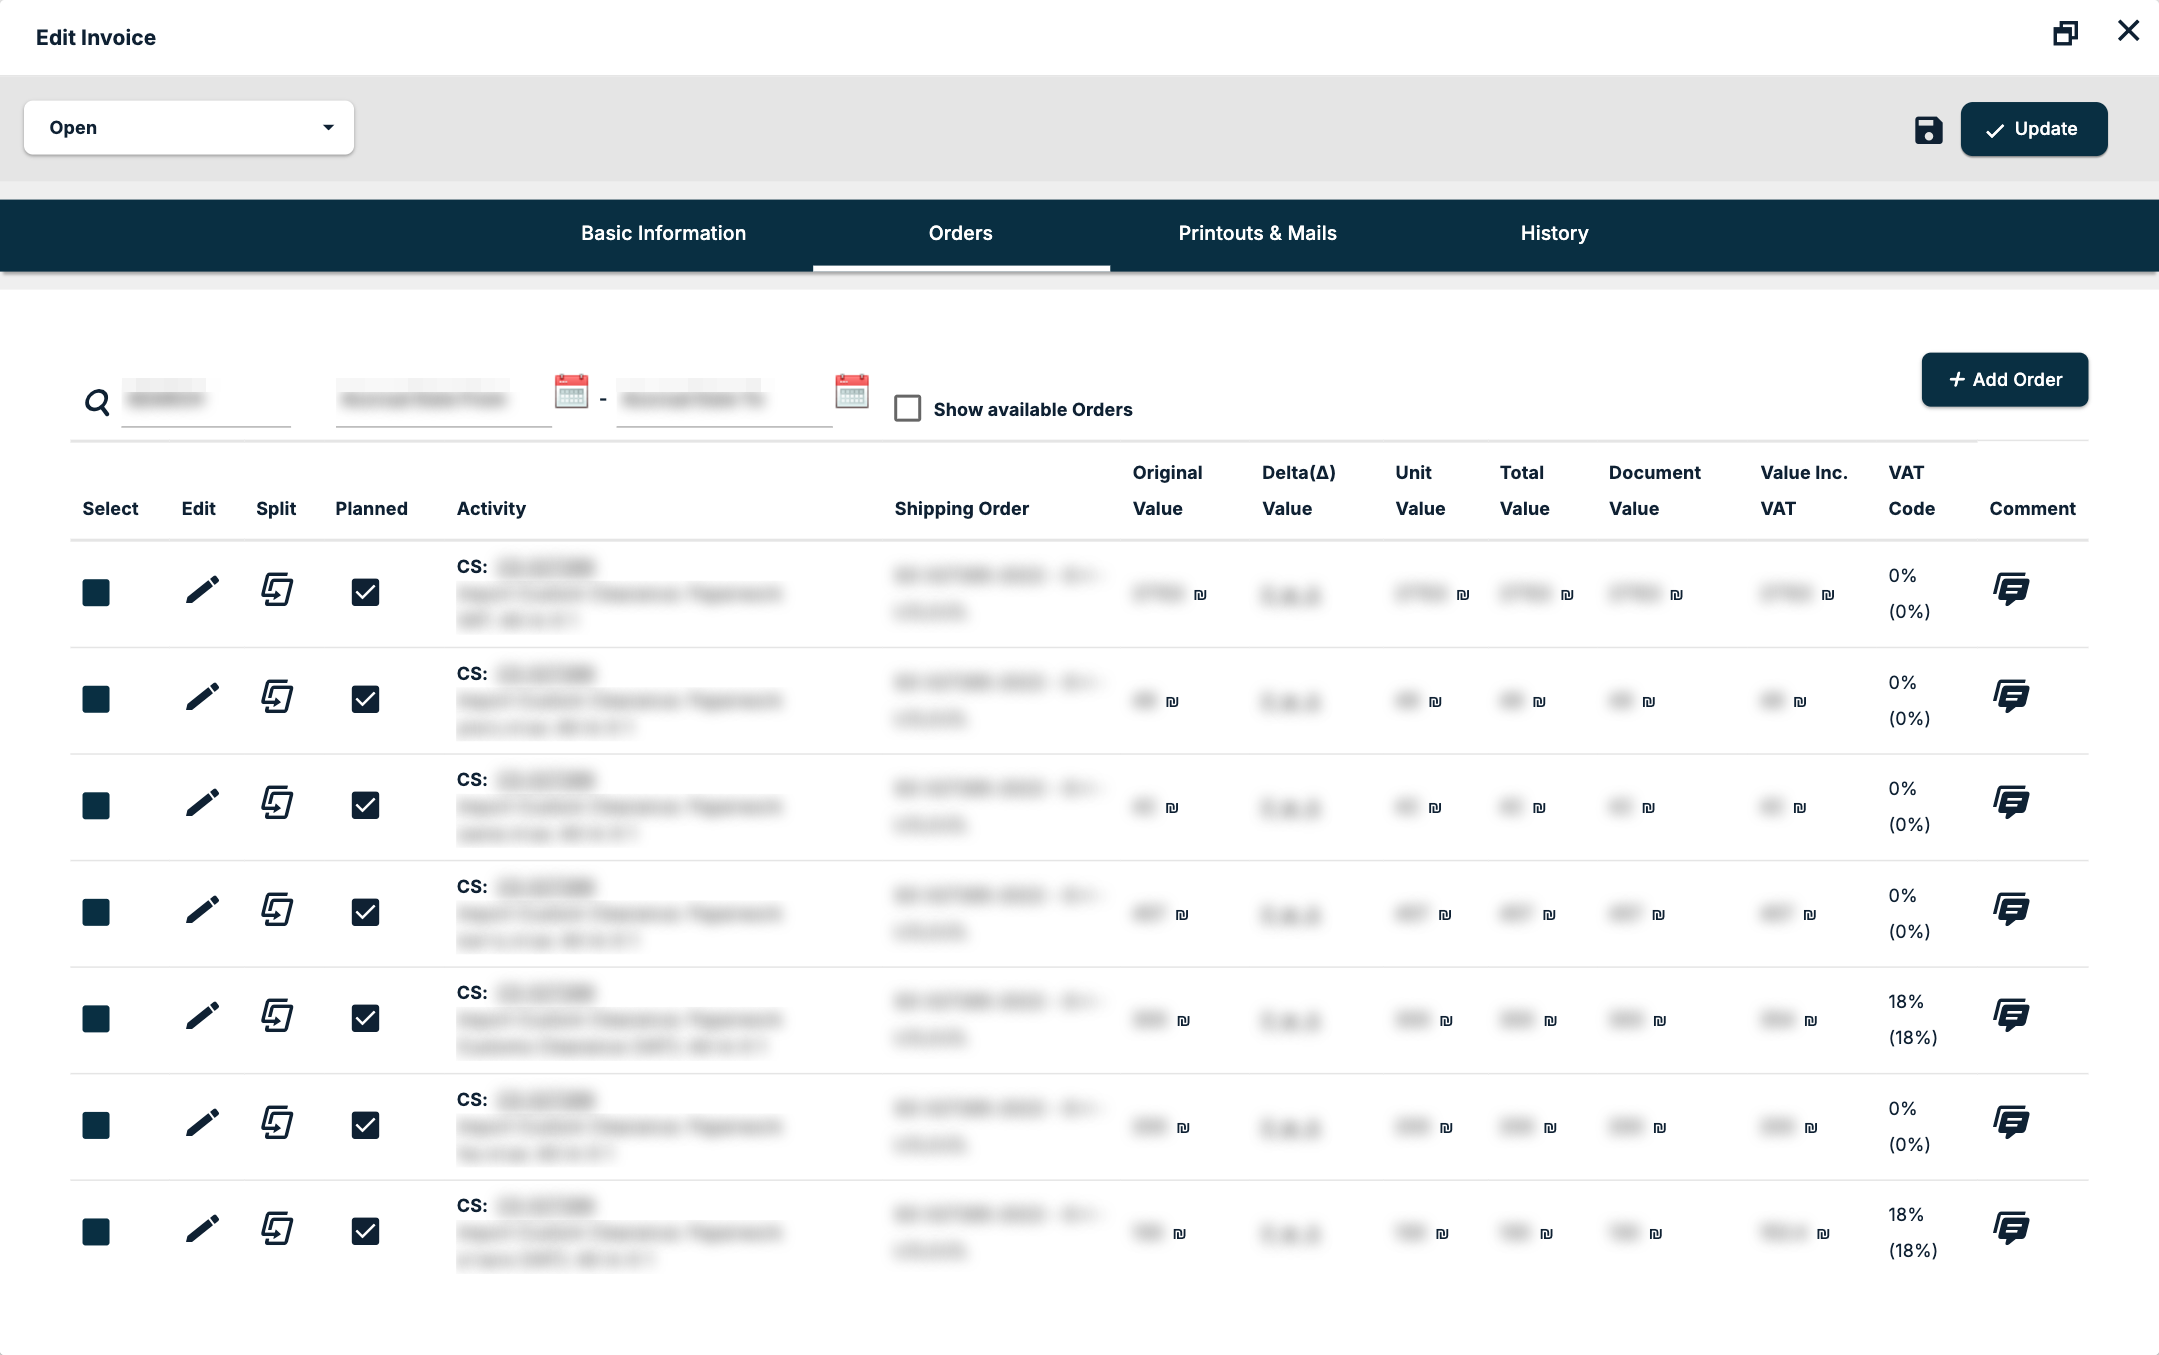
If the agreed amount differs from the original charge, record the difference with the Delta(Δ) Value link on the line rather than changing the charge: Total Value is the Original Value plus the deltas.
Print and send the invoice
On the Printouts & Mails tab:
- Printouts: choose a printout template and click Add New Printout, then View or Create PDF on its row. The template list and Add New Printout appear only once the invoice has been saved.
- Mails: New Mail, Reply and Mails Log.
- Files: Browse and Upload attach files to the invoice.
Hand the invoice over for approval
The status list is at the top left of the invoice window; a new invoice shows Open. When the invoice is ready, set it to Operation Approved and click Update. Which statuses you can pick depends on the invoice's current status and on your user: from Open, an operations user is offered Open, Pending and Operation Approved, and Finance Approved, Paid (Closed) and Canceled are greyed out. See Understanding invoice statuses in Freightools.
If something goes wrong
| You see | What to do |
|---|---|
| A Confirm box about the exchange rate "in the past 7 days" | No company rate for the currency was found for the last seven days. Ask whoever keeps your rates to add one under Settings → Accounting Configuration → Exchange Rates. |
| "This field is required. Please fill it in." | Fill in the field marked with an asterisk. |
| No Create Invoice button on a customer group | The group has no active orders. Check the lines on the Selling side of Economics. |
| Economics or Process Steps is greyed out | Save the SO or CS first. |
| No printout template list on Printouts & Mails | Save the invoice first. |
| No Add Order or Show available Orders on the Orders tab | The invoice has reached Finance Approved or later. Lines can no longer be added. |
Related articles
- How to register a buying invoice against a shipment
- Understanding invoice statuses in Freightools
- How to find and filter invoices
- How to Approve a New Customer for Invoicing
- How to read the economics of a Shipping Order
- Invoice numbering, VAT and tax settings
- How to create credit invoices and change invoice status in bulk