
With Manual create, you type one buying agreement into a form in Freightools AI Studio, with no rate sheet to upload.
Use it for a single or spot rate quoted by phone or email. For a file with many lanes, see Add your rate sheet and choose how to load it. Each agreement is also saved as a template, so next time you only change the prices and dates.
No buying agreements are created in Freightools until you press Create agreement on the review screen.
Before you start
- The supplier must be an active partner set up as a supplier in Freightools.
- Know the ports by name, city or UN/LOCODE (the five-character UN location code, for example
CNSHA). - Manual create covers port-to-port rates. Door addresses can't be picked: for a door pickup or delivery, create the agreement in Freightools itself.
Open Manual create
- Open your studio link (see Open your studio link and find your way around) and keep Buying selected.
- Under Know what you want? Pick a method, click the Manual create card. An empty form opens.
Nothing is saved while you fill in the form: Back or a page reload loses what you typed. Clicking Manual create on a load's How should we load it? step leaves that load — your answers are kept if you go back to it, but you'll need to add the file again.
Fill in the details
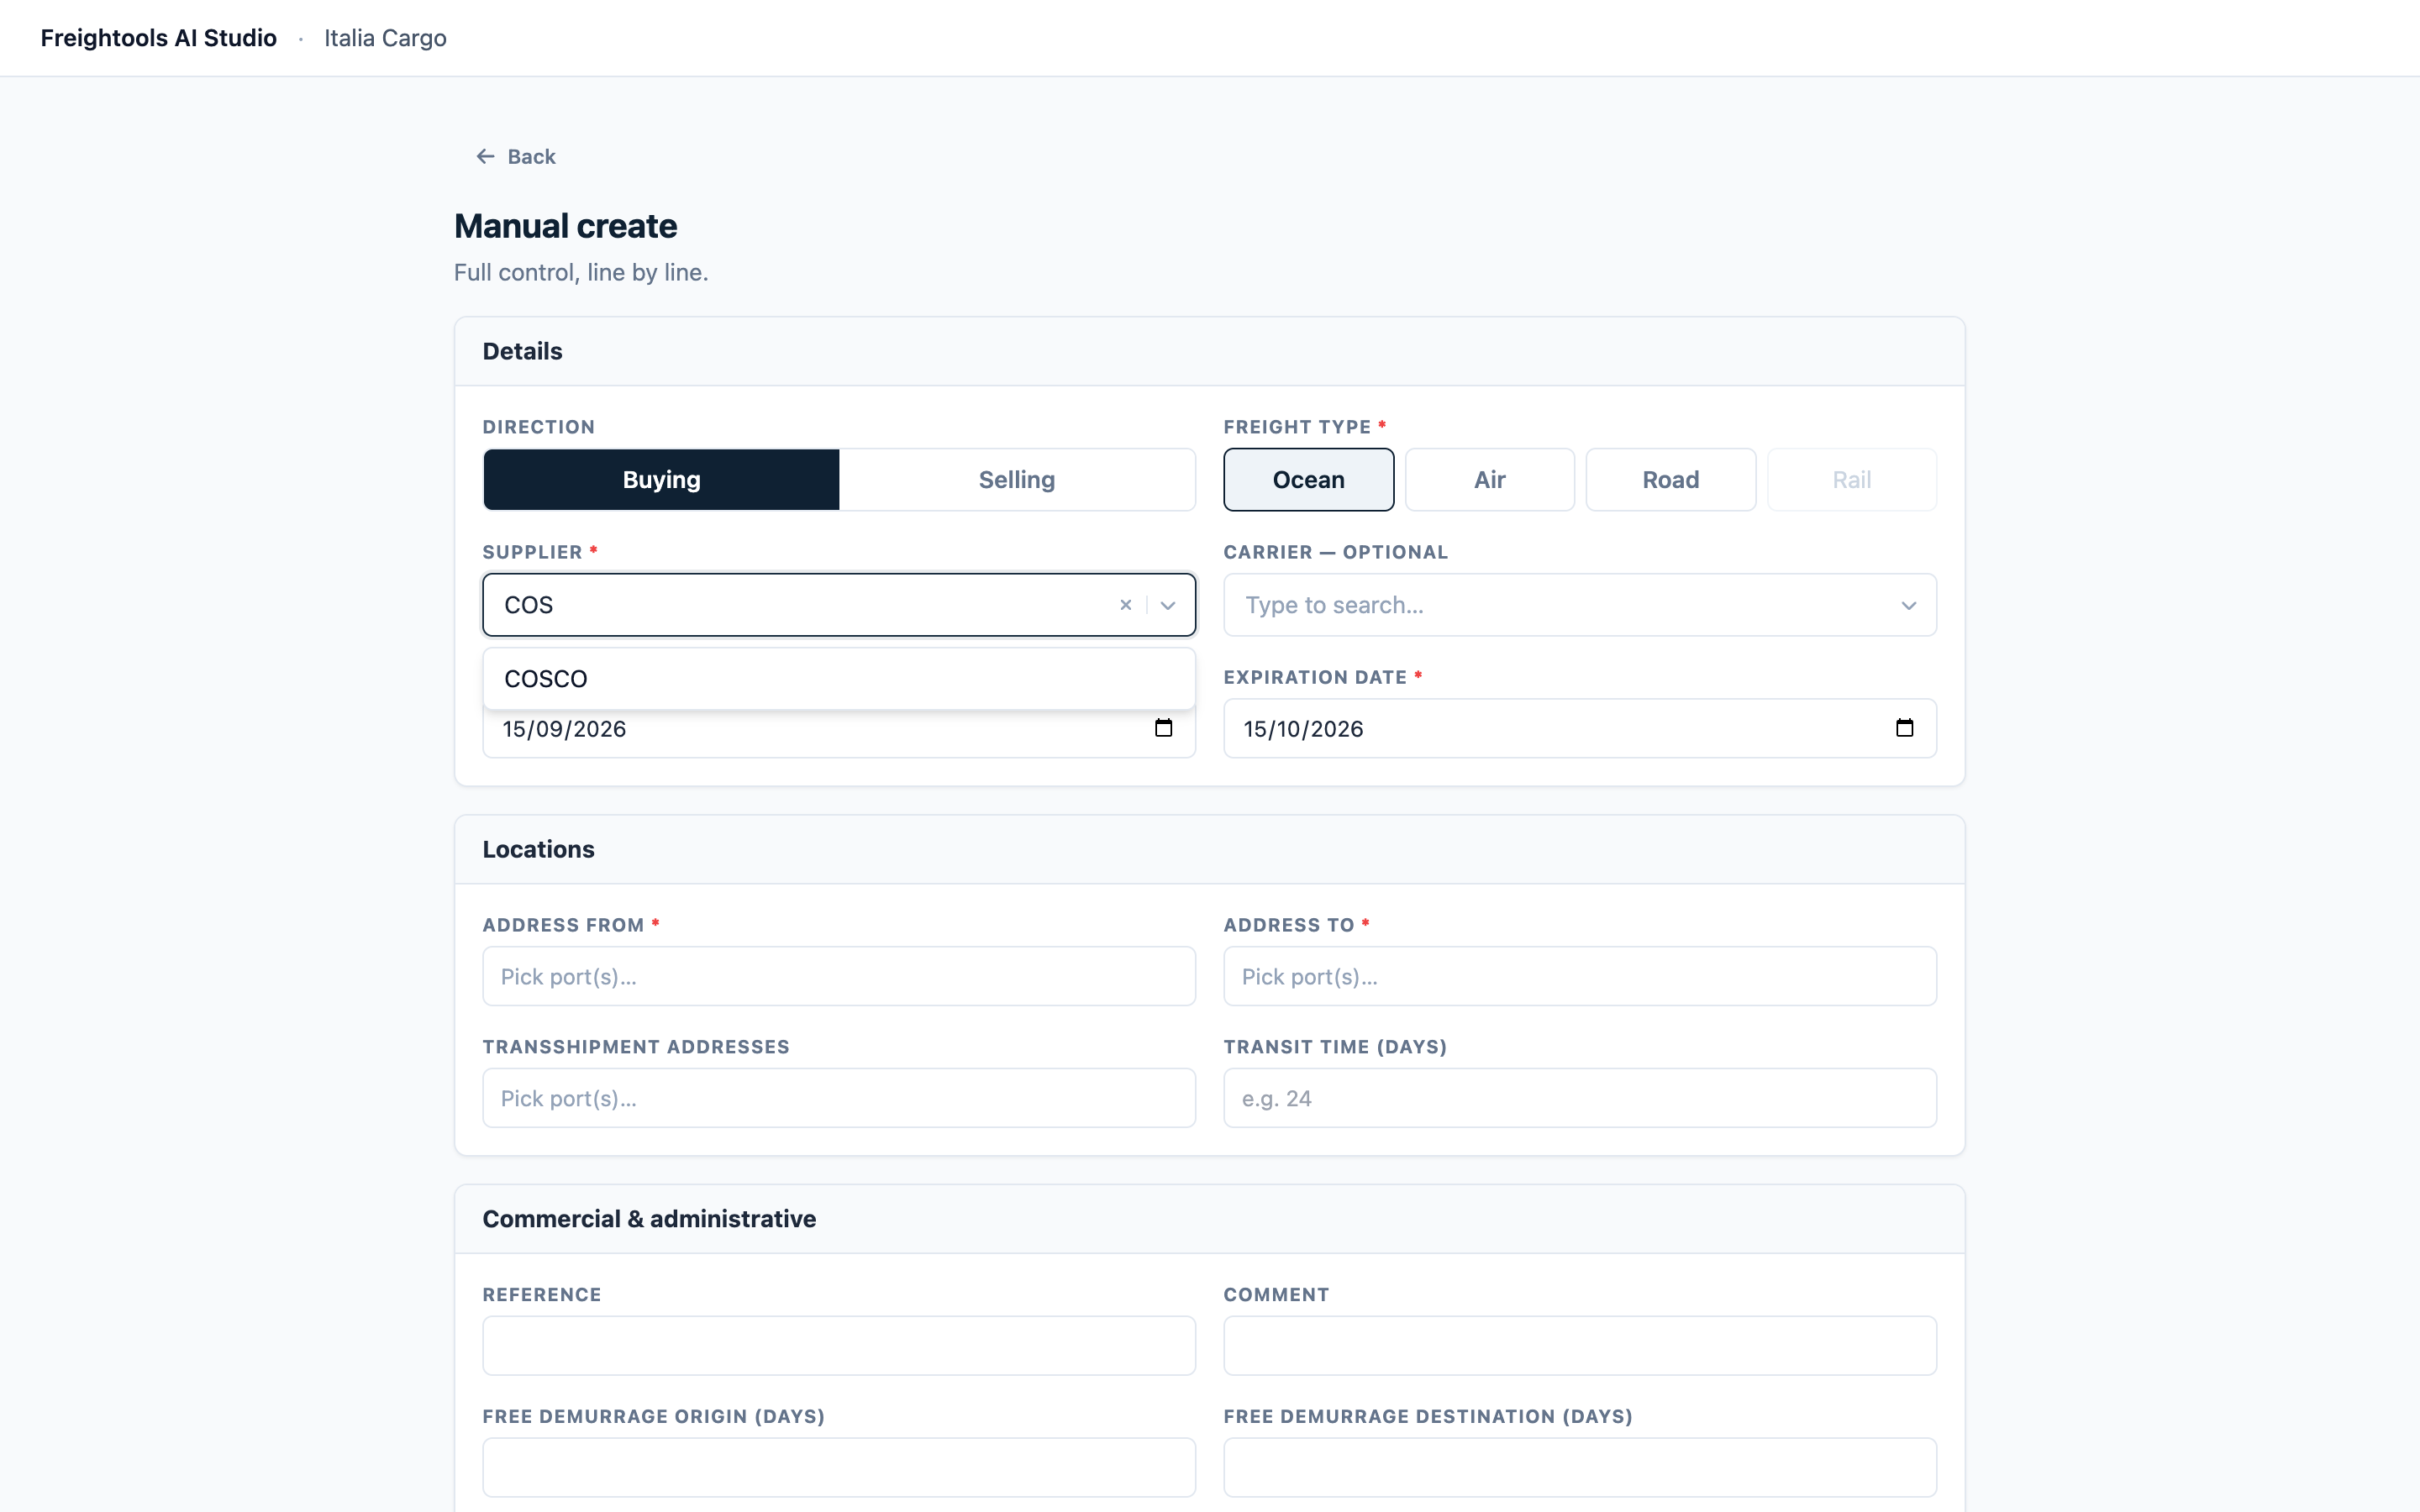
- Under Direction, keep Buying selected. Switching direction clears the supplier.
- Under Freight type, click Ocean, Air or Road. Rail is grayed out — create a rail agreement in Freightools.
- Click Supplier, type part of the supplier's name, and click the supplier in the list.
- Optional: in Carrier — optional, type part of the carrier's name or code and pick it. Fill it in when the supplier quoted the rate for one carrier; leave it blank when the rate isn't tied to a carrier.
- Check Validity date and Expiration date. They start as today and one month later; click a date to change it. Both are required.
Choose the ports
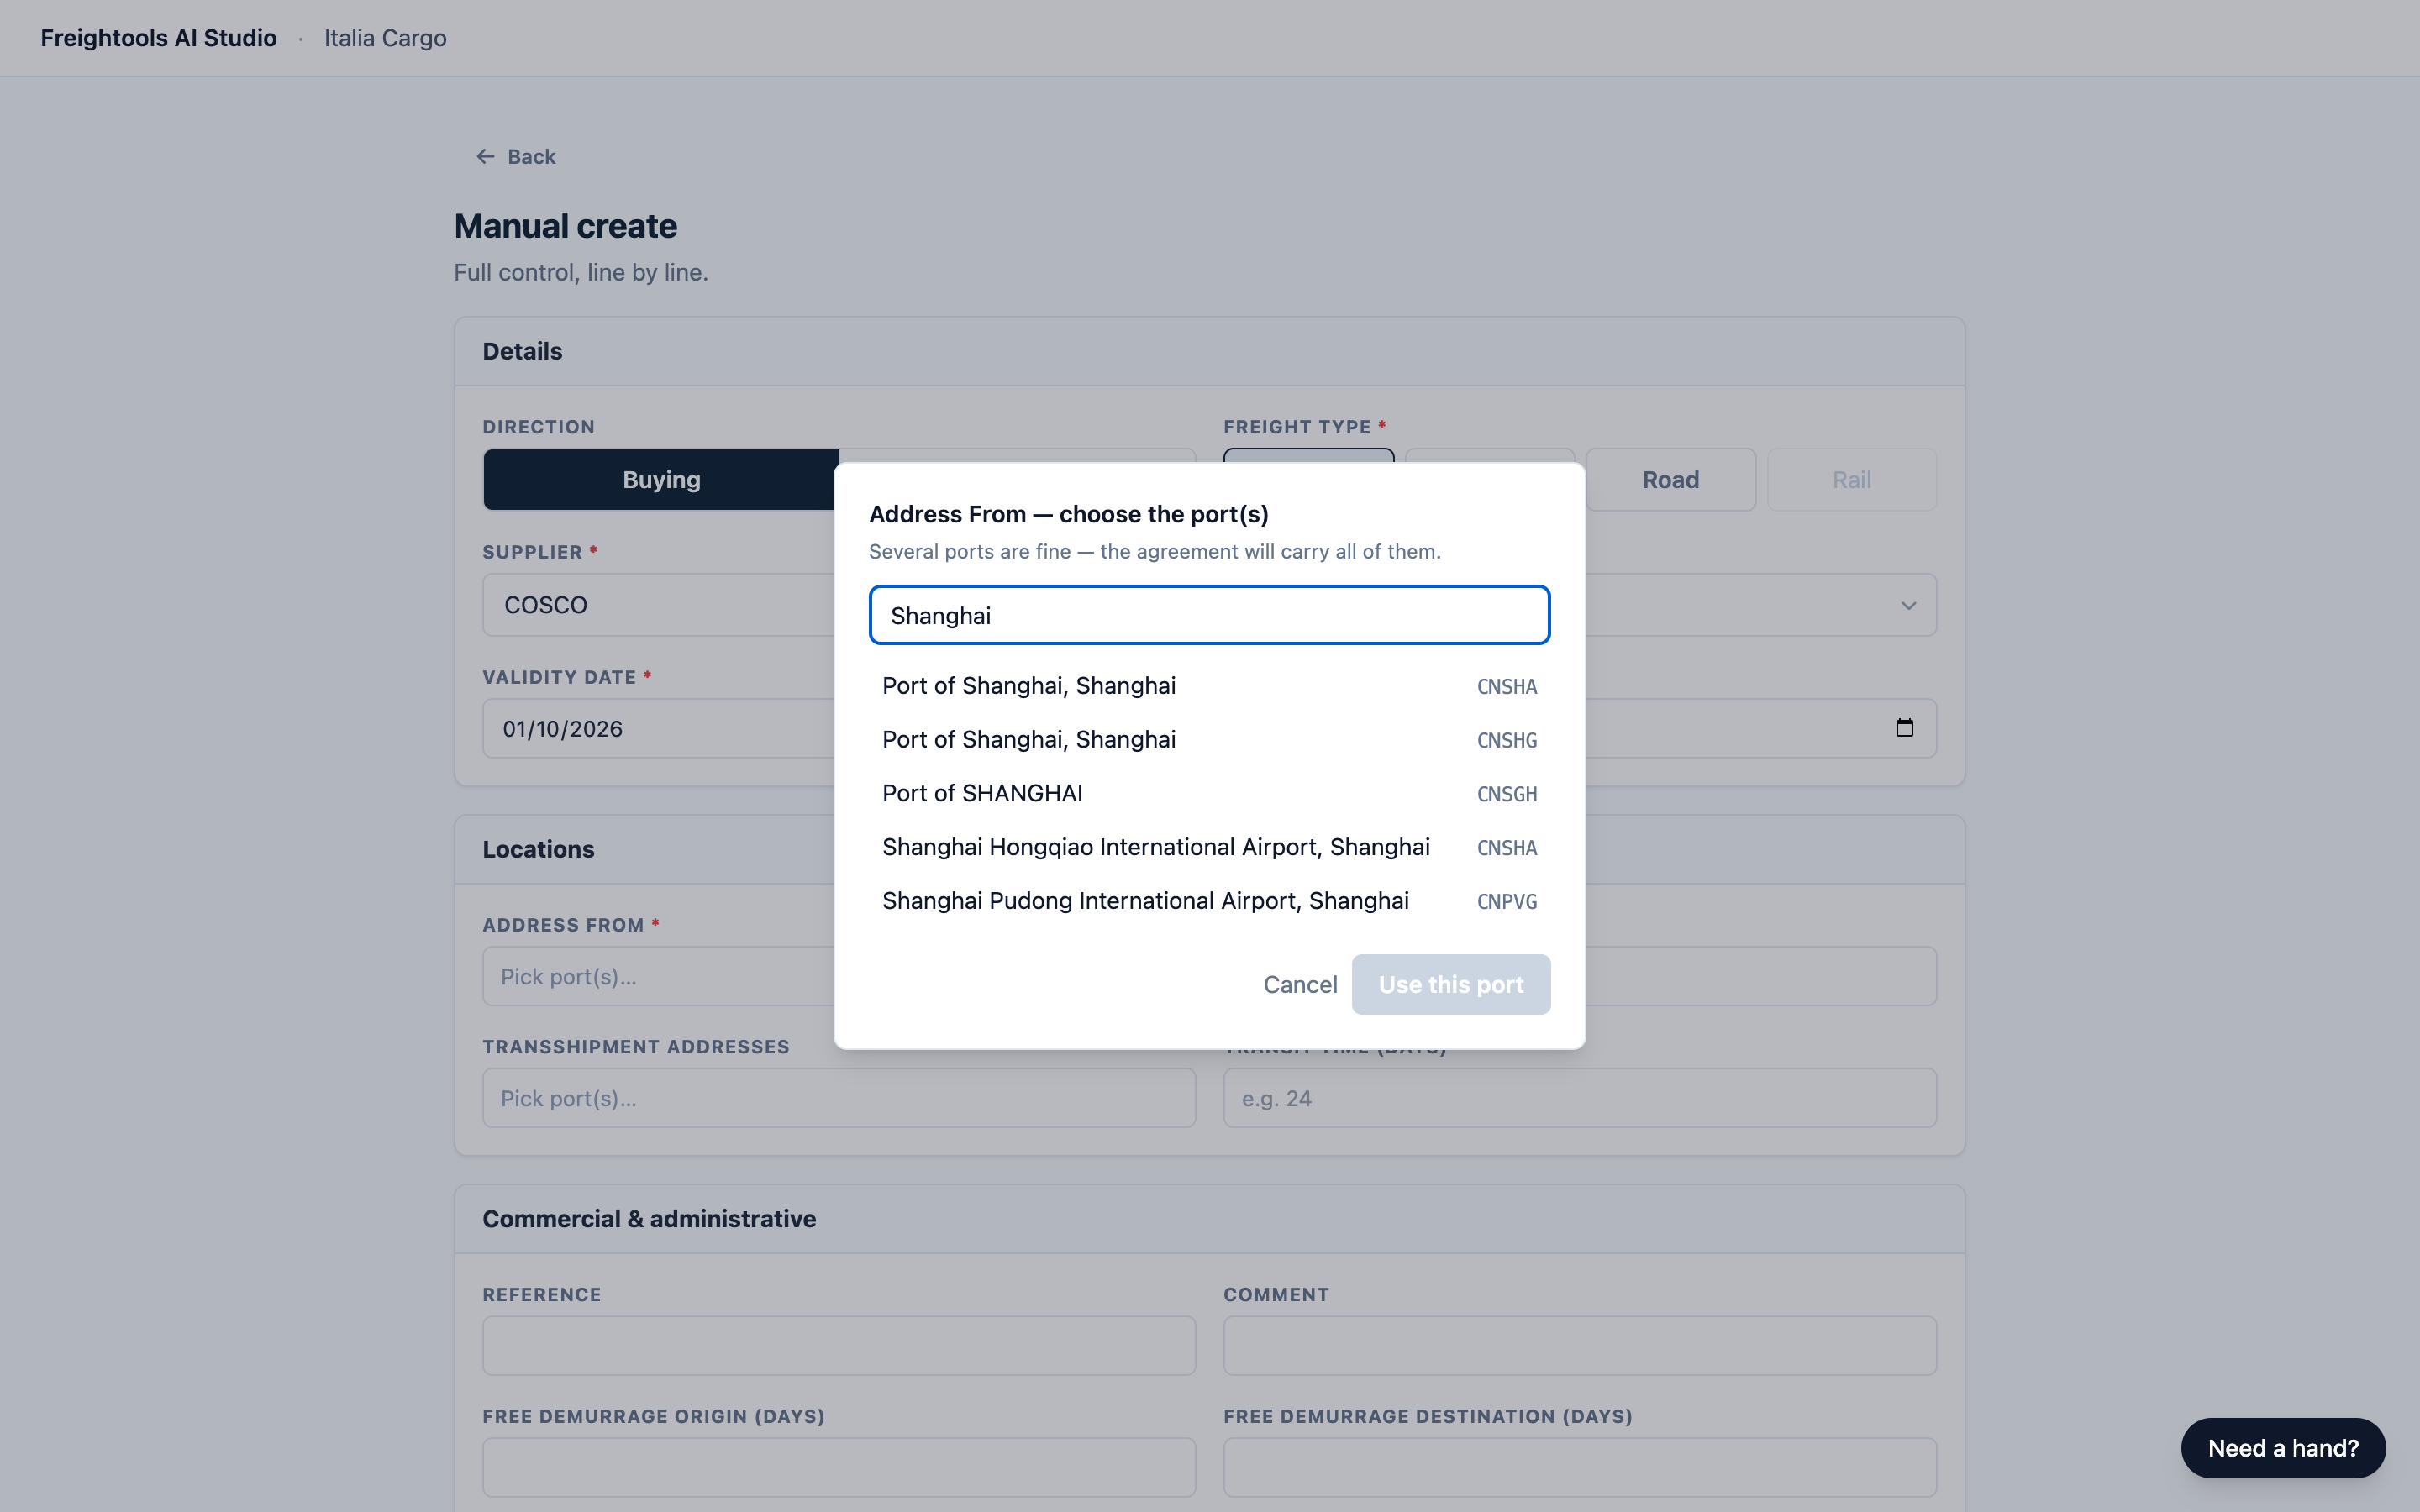
- Click Address From. The Address From — choose the port(s) window opens.
- In Search by name, city or code…, type at least two characters.
- Click a result. It appears at the top as a green chip. To remove it, click × on the chip.
- Click Use this port (or Use these 2 ports, and so on).
- Do the same for Address To (required) and, if the rate goes via a port, Transshipment addresses.
- Optional: type the Transit time (days) as a whole number of days.
- Several ports share one set of prices. For different prices per port, create one agreement per price set, or load the rate sheet.
- Sea port or airport. Some UN/LOCODEs cover both. The results aren't labeled sea or air, but their names differ, and the chip shows the code and the full name — read it before you click Use this port. To switch, remove the chip and add the other.
Add commercial and administrative details
All optional:
- Reference and Comment — your own labels for this agreement. Leave Reference blank and the studio fills in a short default.
- Free demurrage origin (days) and Free demurrage destination (days) — the free days the supplier allows.
- Opposite direction — the same prices also apply the other way round.
- Dangerous — the rate is for dangerous goods.
- Special (NAC) rate — the rate is a named-account rate agreed for one customer.
- Exclude from quotation — keep this rate out of quotations.
Add the activity and price lines
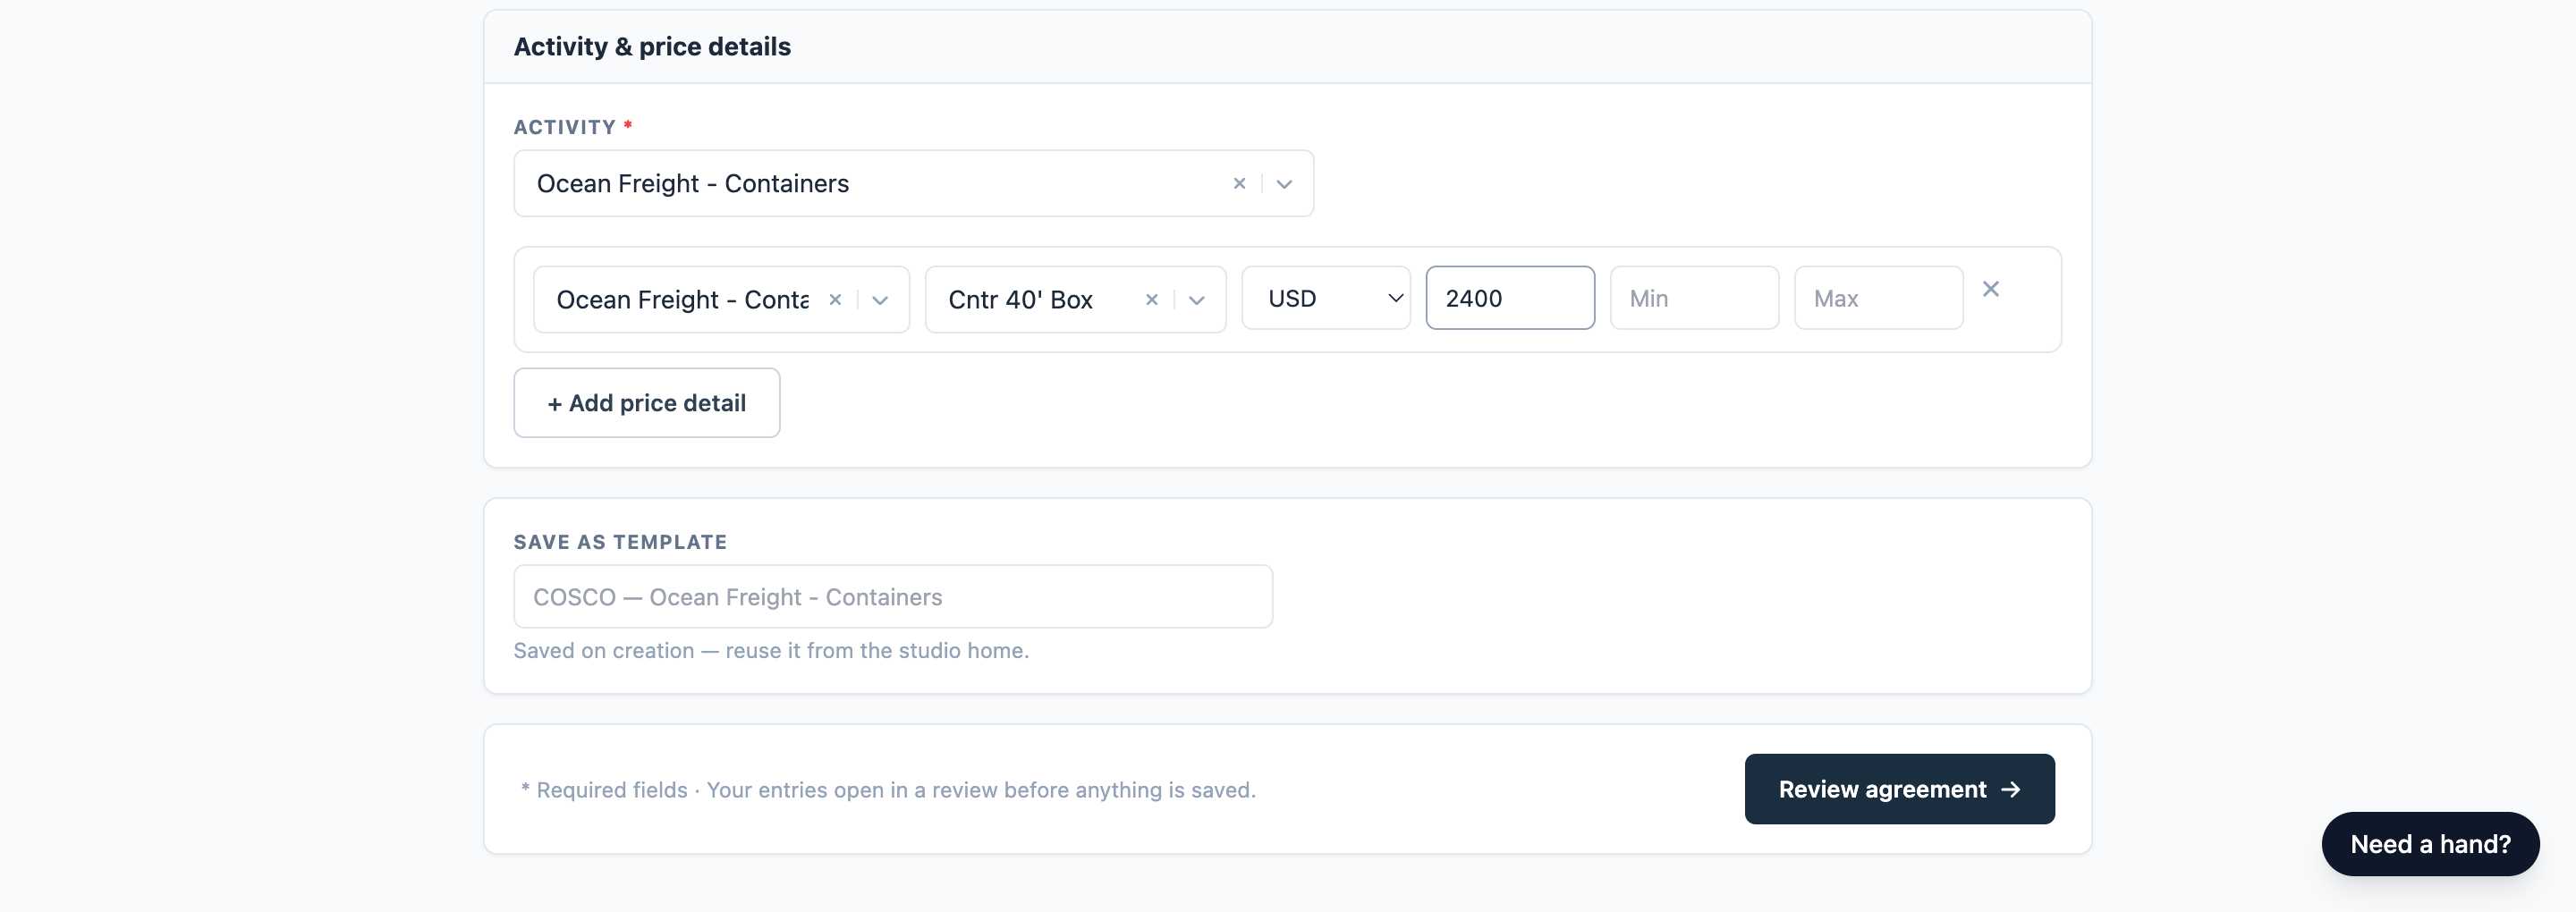
- Under Activity & price details, type part of the activity name and pick the Activity that matches the rate you're loading — for a full-container ocean rate, an ocean FCL activity. Its standard charges appear as price lines.
- On each line, pick the charge in Price detail…, and in Evaluation type… how the charge is counted — the basis the supplier quoted, such as per container or per shipment. A currency is already picked on each line: check it before you type the price.
- Type the Price. Min and Max are optional: use them when the supplier quoted a smallest or largest amount for that charge, and leave them blank otherwise.
- Delete lines you have no price for with the × at their end. A charge without a price blocks the review.
- To add a line, click + Add price detail.
Note: Picking another activity doesn't change lines already filled in. If the charges that appear aren't the ones you were quoted, you picked the wrong activity: delete all lines first, then pick the right one.
Each line is one price. For a rate with several prices per container size or per weight break, load it as a rate sheet instead — see Add your rate sheet and choose how to load it.
Type prices as digits with a dot for decimals and no thousands separator: 1500.00.
Warning: 1.500 is read as 1.5 — check every price on the review screen.
Name the template (optional)
Under Save as template, type a name, or leave it blank to use the supplier and activity. You can start your next agreement from it.
Review the agreement
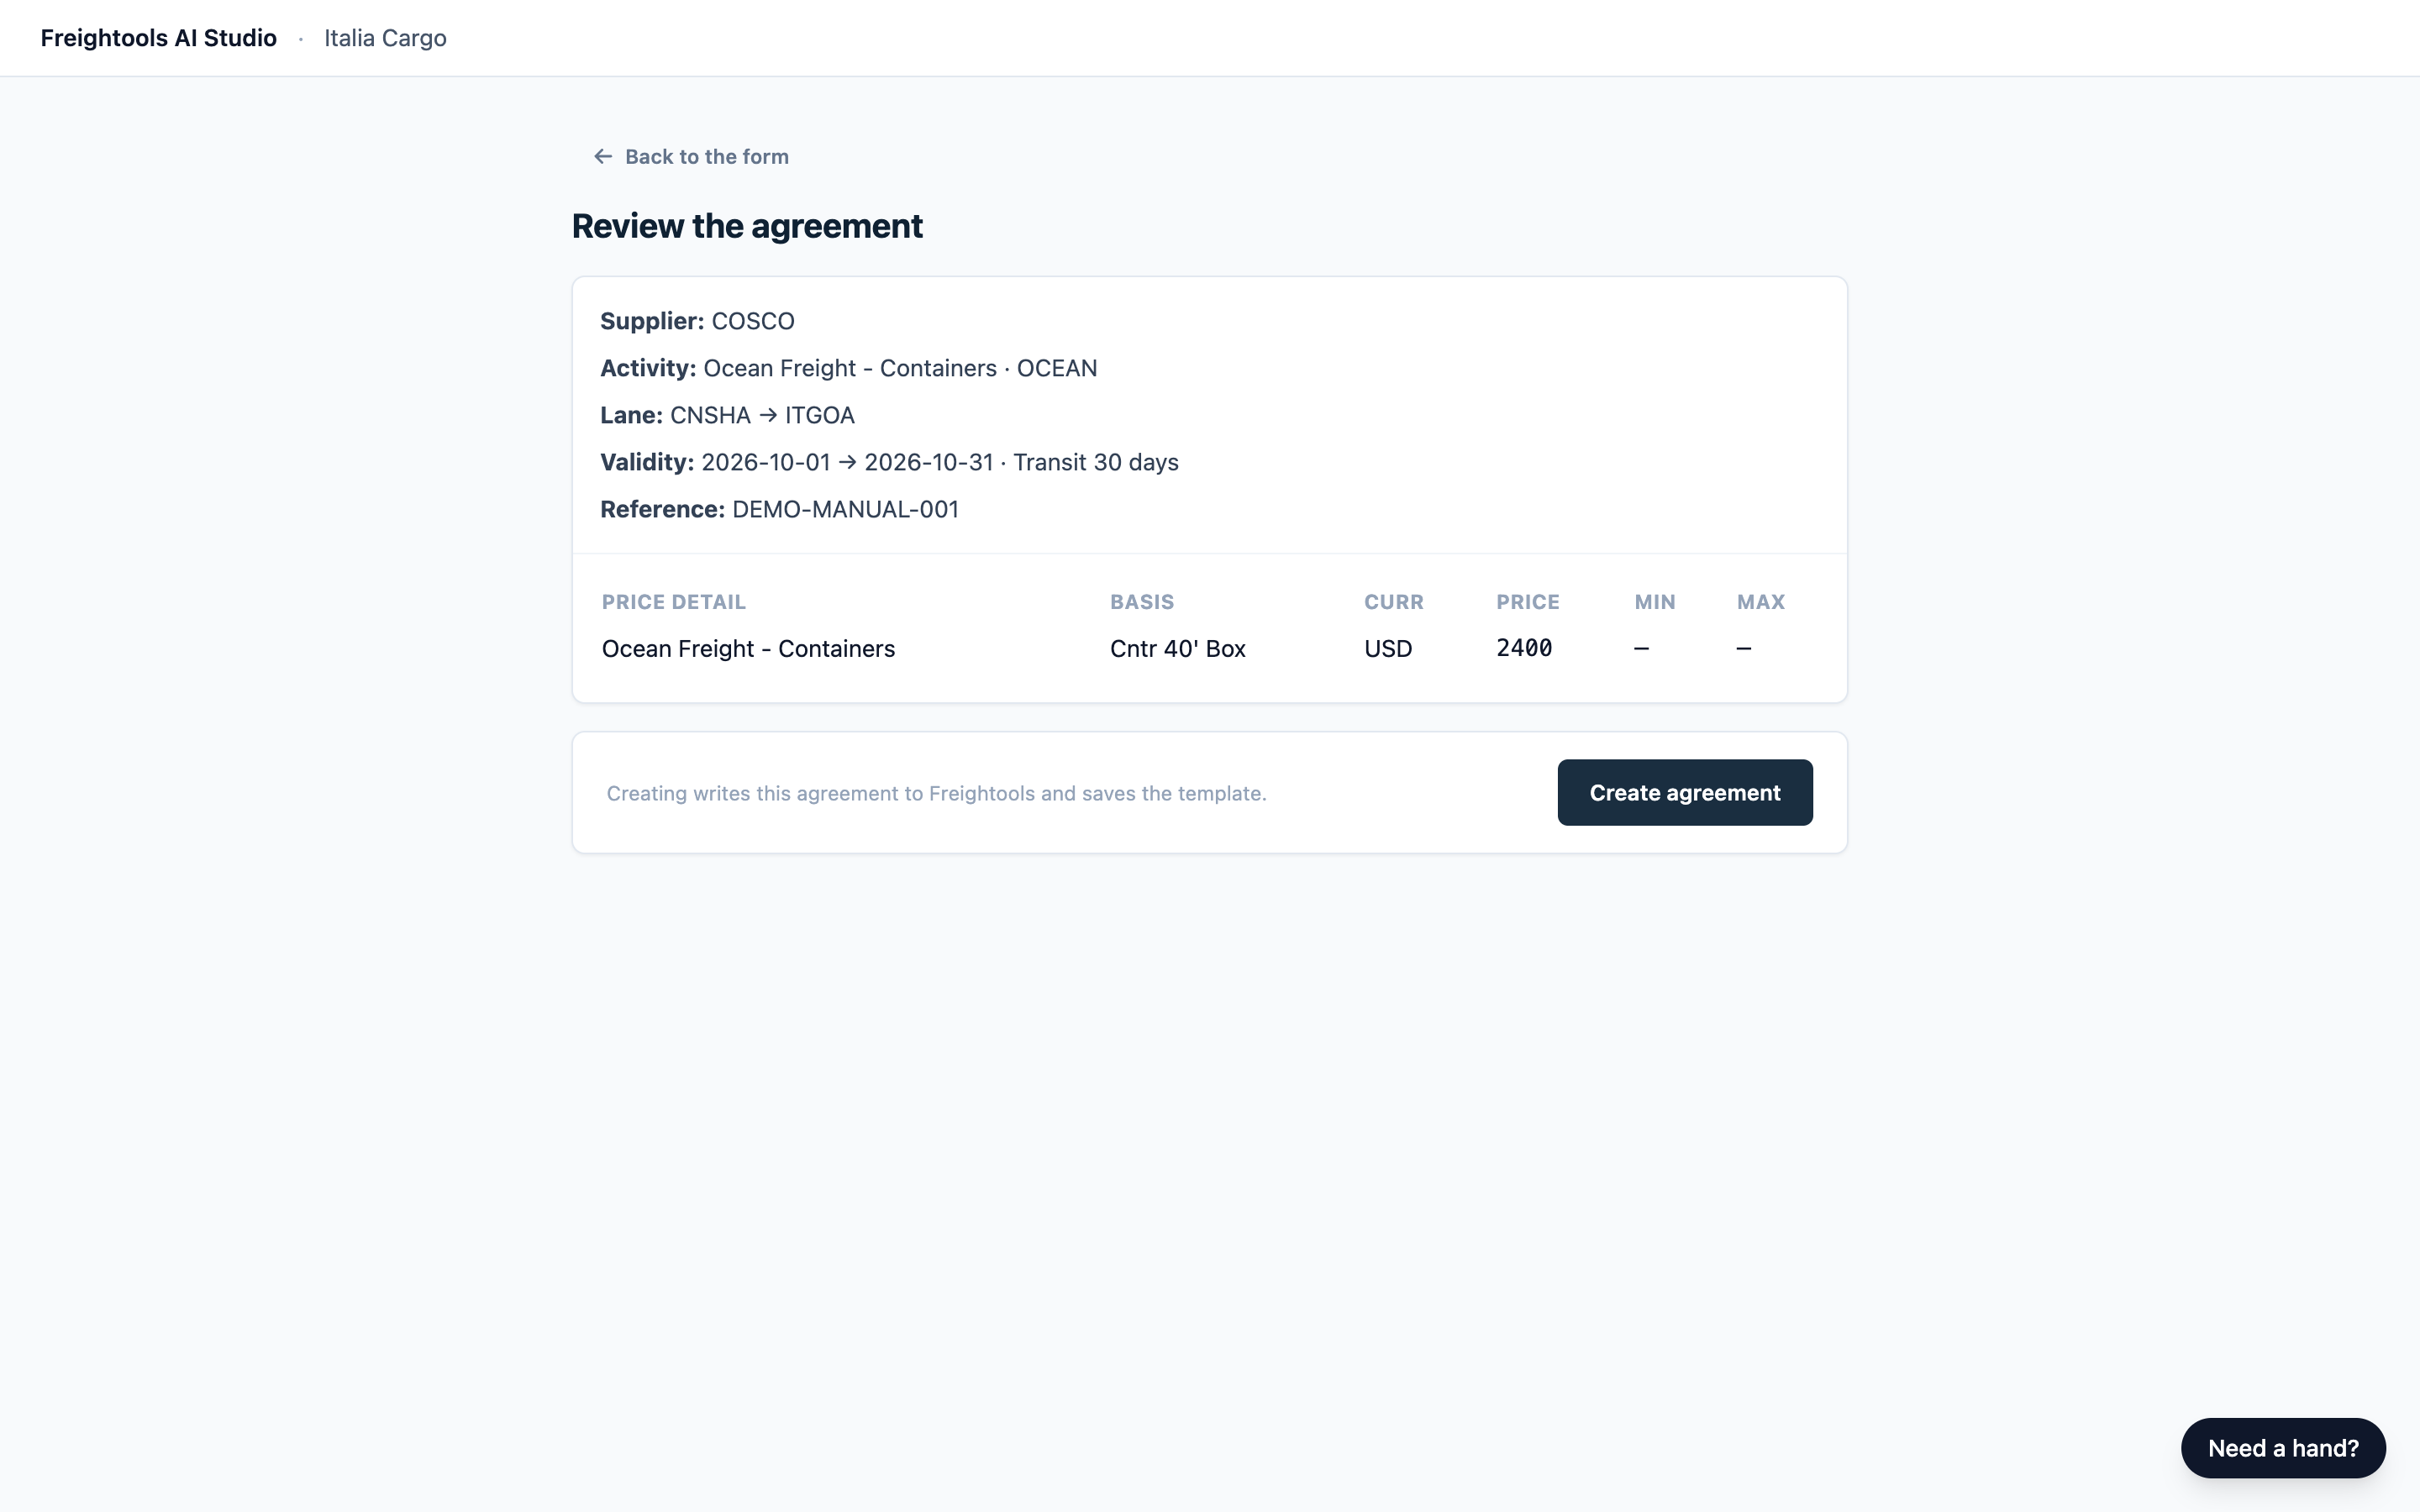
- Click Review agreement. The Review the agreement screen opens.
- Check the summary and the price table.
- To change anything, click Back to the form. What you typed is kept.
If Review agreement is grayed out, an amber message next to it says what to fix:
| Message | What to do |
|---|---|
| "Pick the supplier." (or activity, origin port, destination port) | Fill in that field. |
| "Set the validity window." or "Expiration must be after the validity date." | Pick both dates, expiration on or after validity. |
| "Add at least one price line." | Pick a charge and type a price on a line. |
| "Line 2: price — use digits with a dot decimal, e.g. 1500.00." (or minimum, maximum) | Fix the value, or delete the line. |
| "Line 2: pick the price detail." (or evaluation type, currency) | Pick it on that line, or delete the line. |
| A message about the transit time or free demurrage | Type a smaller whole number of days. |
Create the agreement
Warning: Create agreement writes a real buying agreement to Freightools straight away. The studio can't undo it; change or delete it in Freightools.
- Click Create agreement. It takes a few seconds.
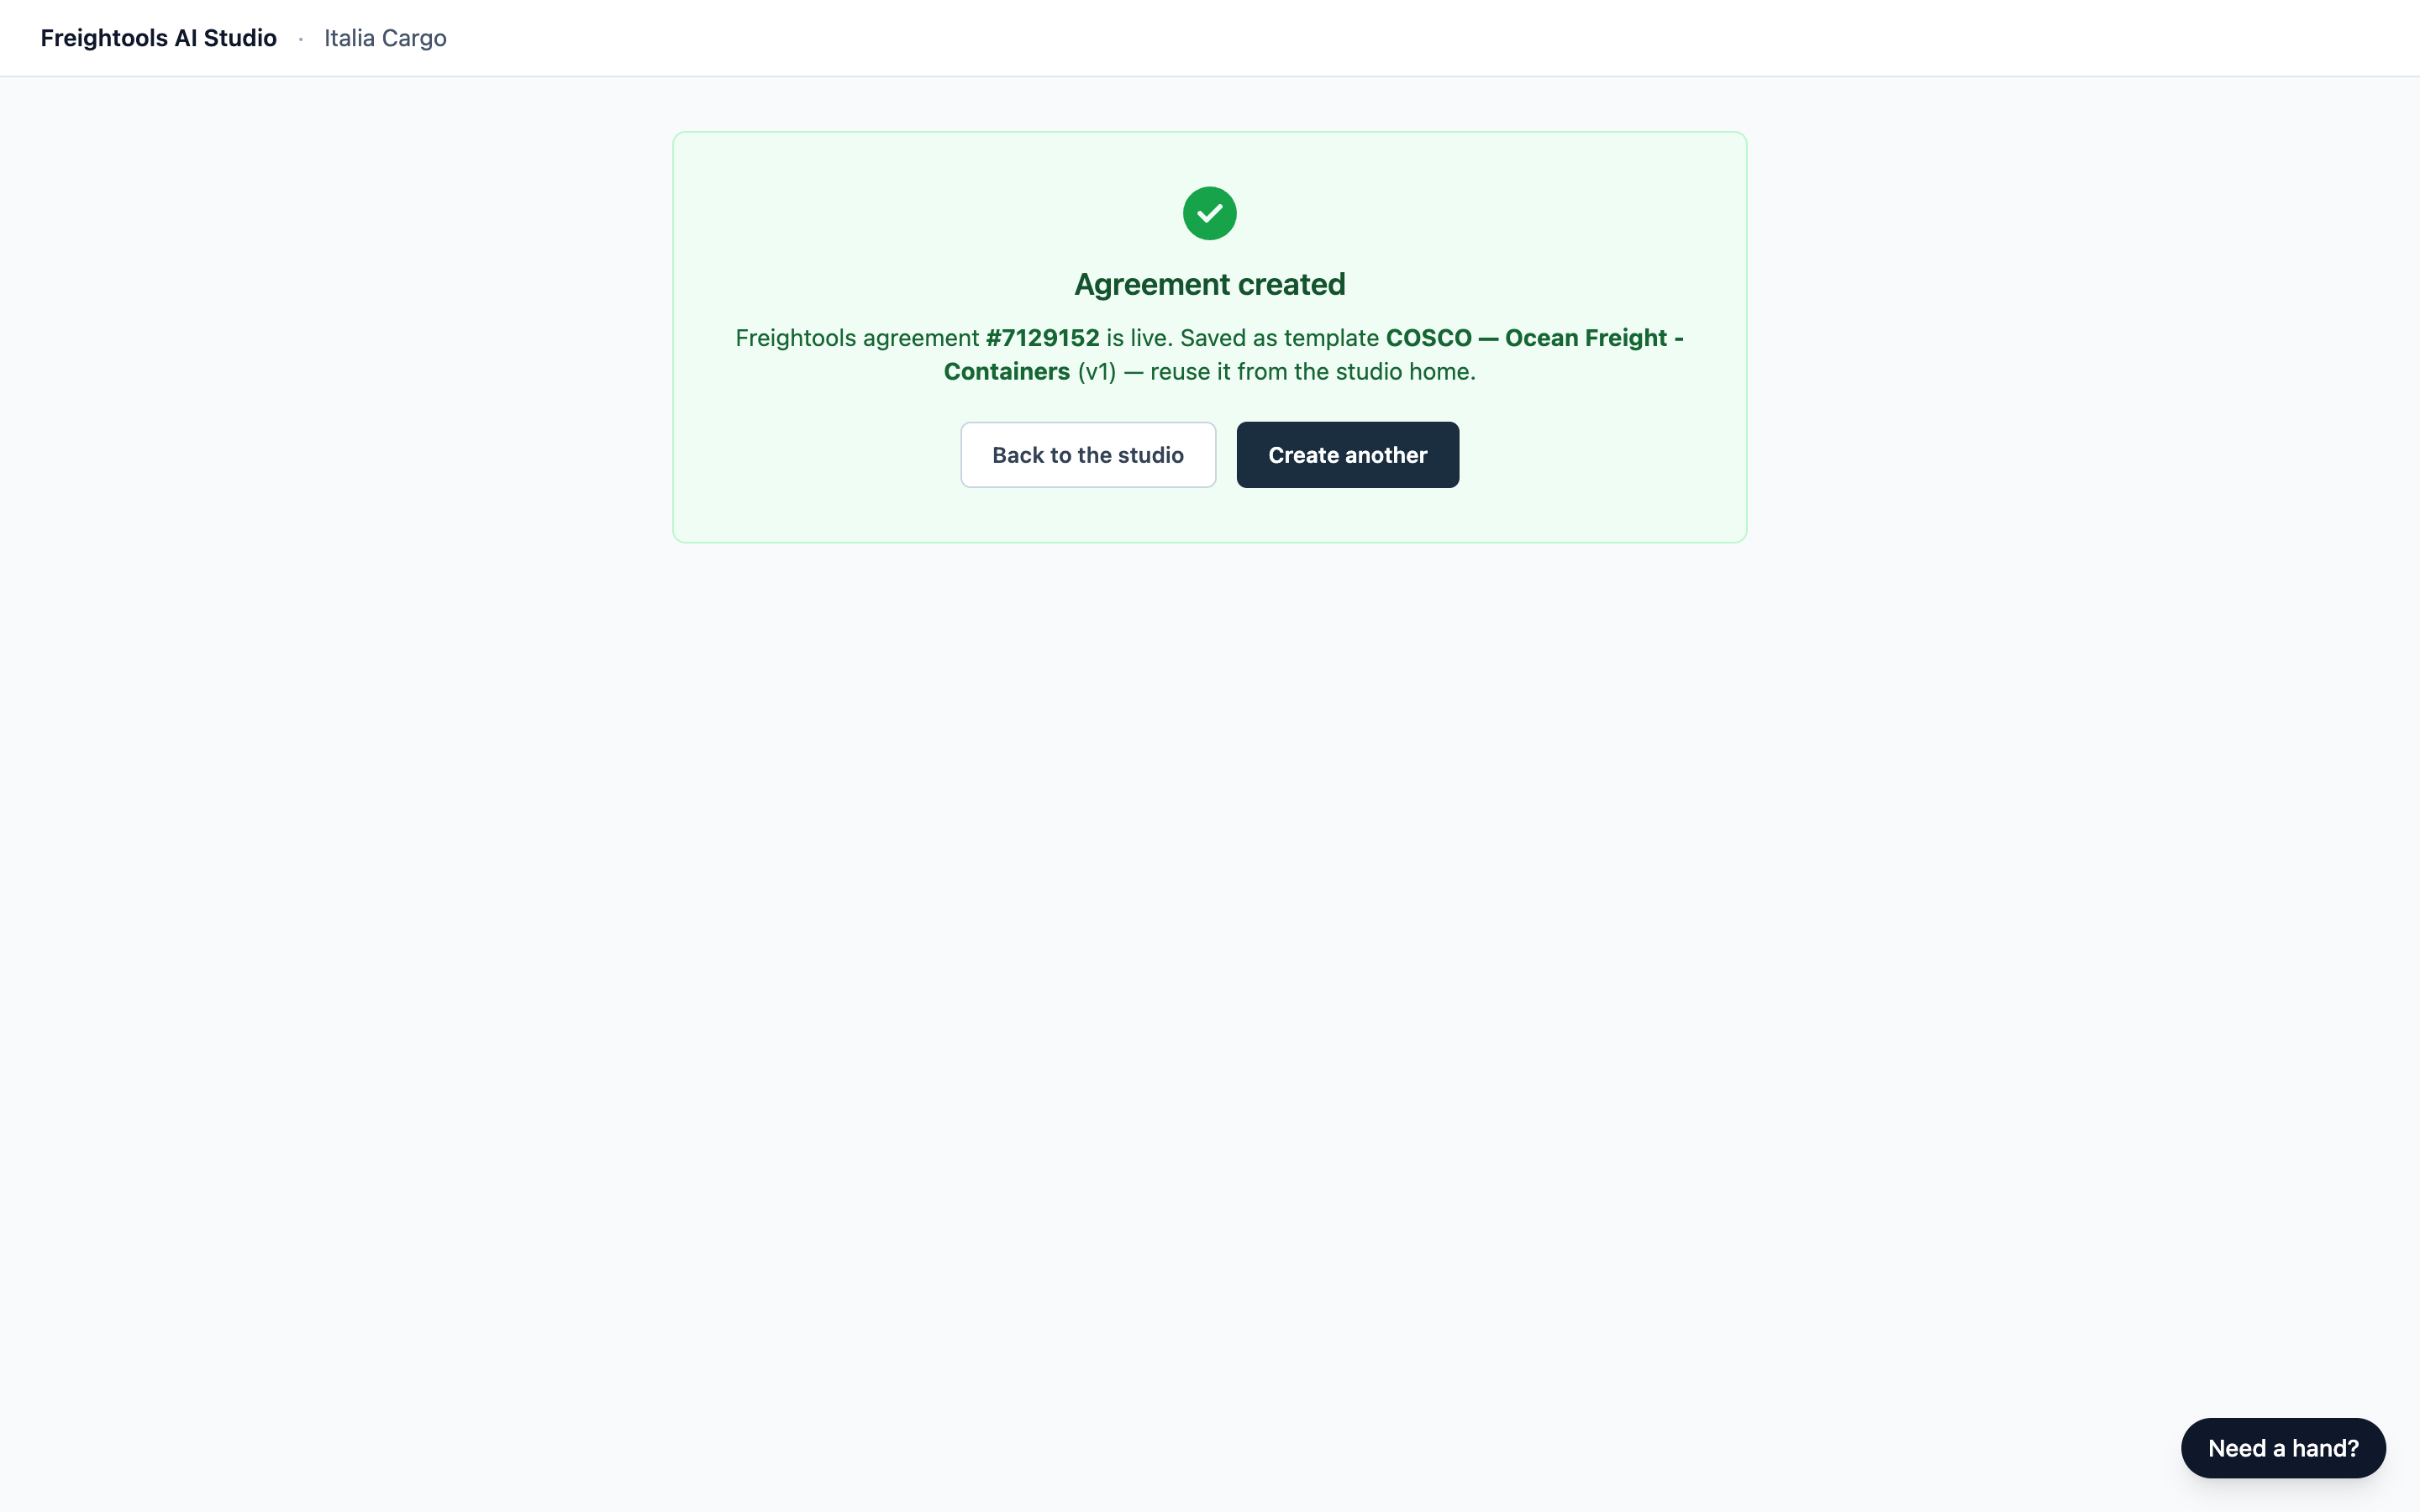
- The Agreement created screen shows "Freightools agreement #" with the number, and the template's name. If no template name appears, the agreement was still created.
- Click Back to the studio, or Create another for an empty form.
If the agreement is not created
A red message appears next to Create agreement.
| Message | What to do |
|---|---|
| A message saying Freightools couldn't be reached, or a network problem | Nothing was created. Wait a moment, then click Create agreement again. |
| "Freightools rejected this agreement — …" | Nothing was created. Click Back to the form, fix what the message names, and create again. |
| A message ending "any more — pick it again." | Nothing was created. Click Back to the form and pick that item again. |
| "… is not set up as a supplier in Freightools…" | Nothing was created. Pick another supplier, or ask your Freightools administrator to set the partner up as a supplier. |
| A message saying the create wasn't confirmed, or that the agreement may already exist | Look in Freightools at the supplier's buying agreements first. If it's there, don't create it again. If not, click Back to the form, then review and create again. |
| "This workspace is not connected to Freightools." | Ask your Freightools contact to connect your studio link. |
| Anything else | Don't click Create agreement again. Check in Freightools whether the agreement was created, then send the message you saw to your Freightools contact. |
Reuse a saved template
Templates appear on the home screen under Saved configurations.
- Keep Buying selected. Under Recently used, or in View all configurations, click Open template. You can also search for the template by name.
- The form opens filled in, with a "From template: …" chip next to the title.
- Change what is different, usually the prices and dates.
- Click Review agreement, then Create agreement. The template is updated.
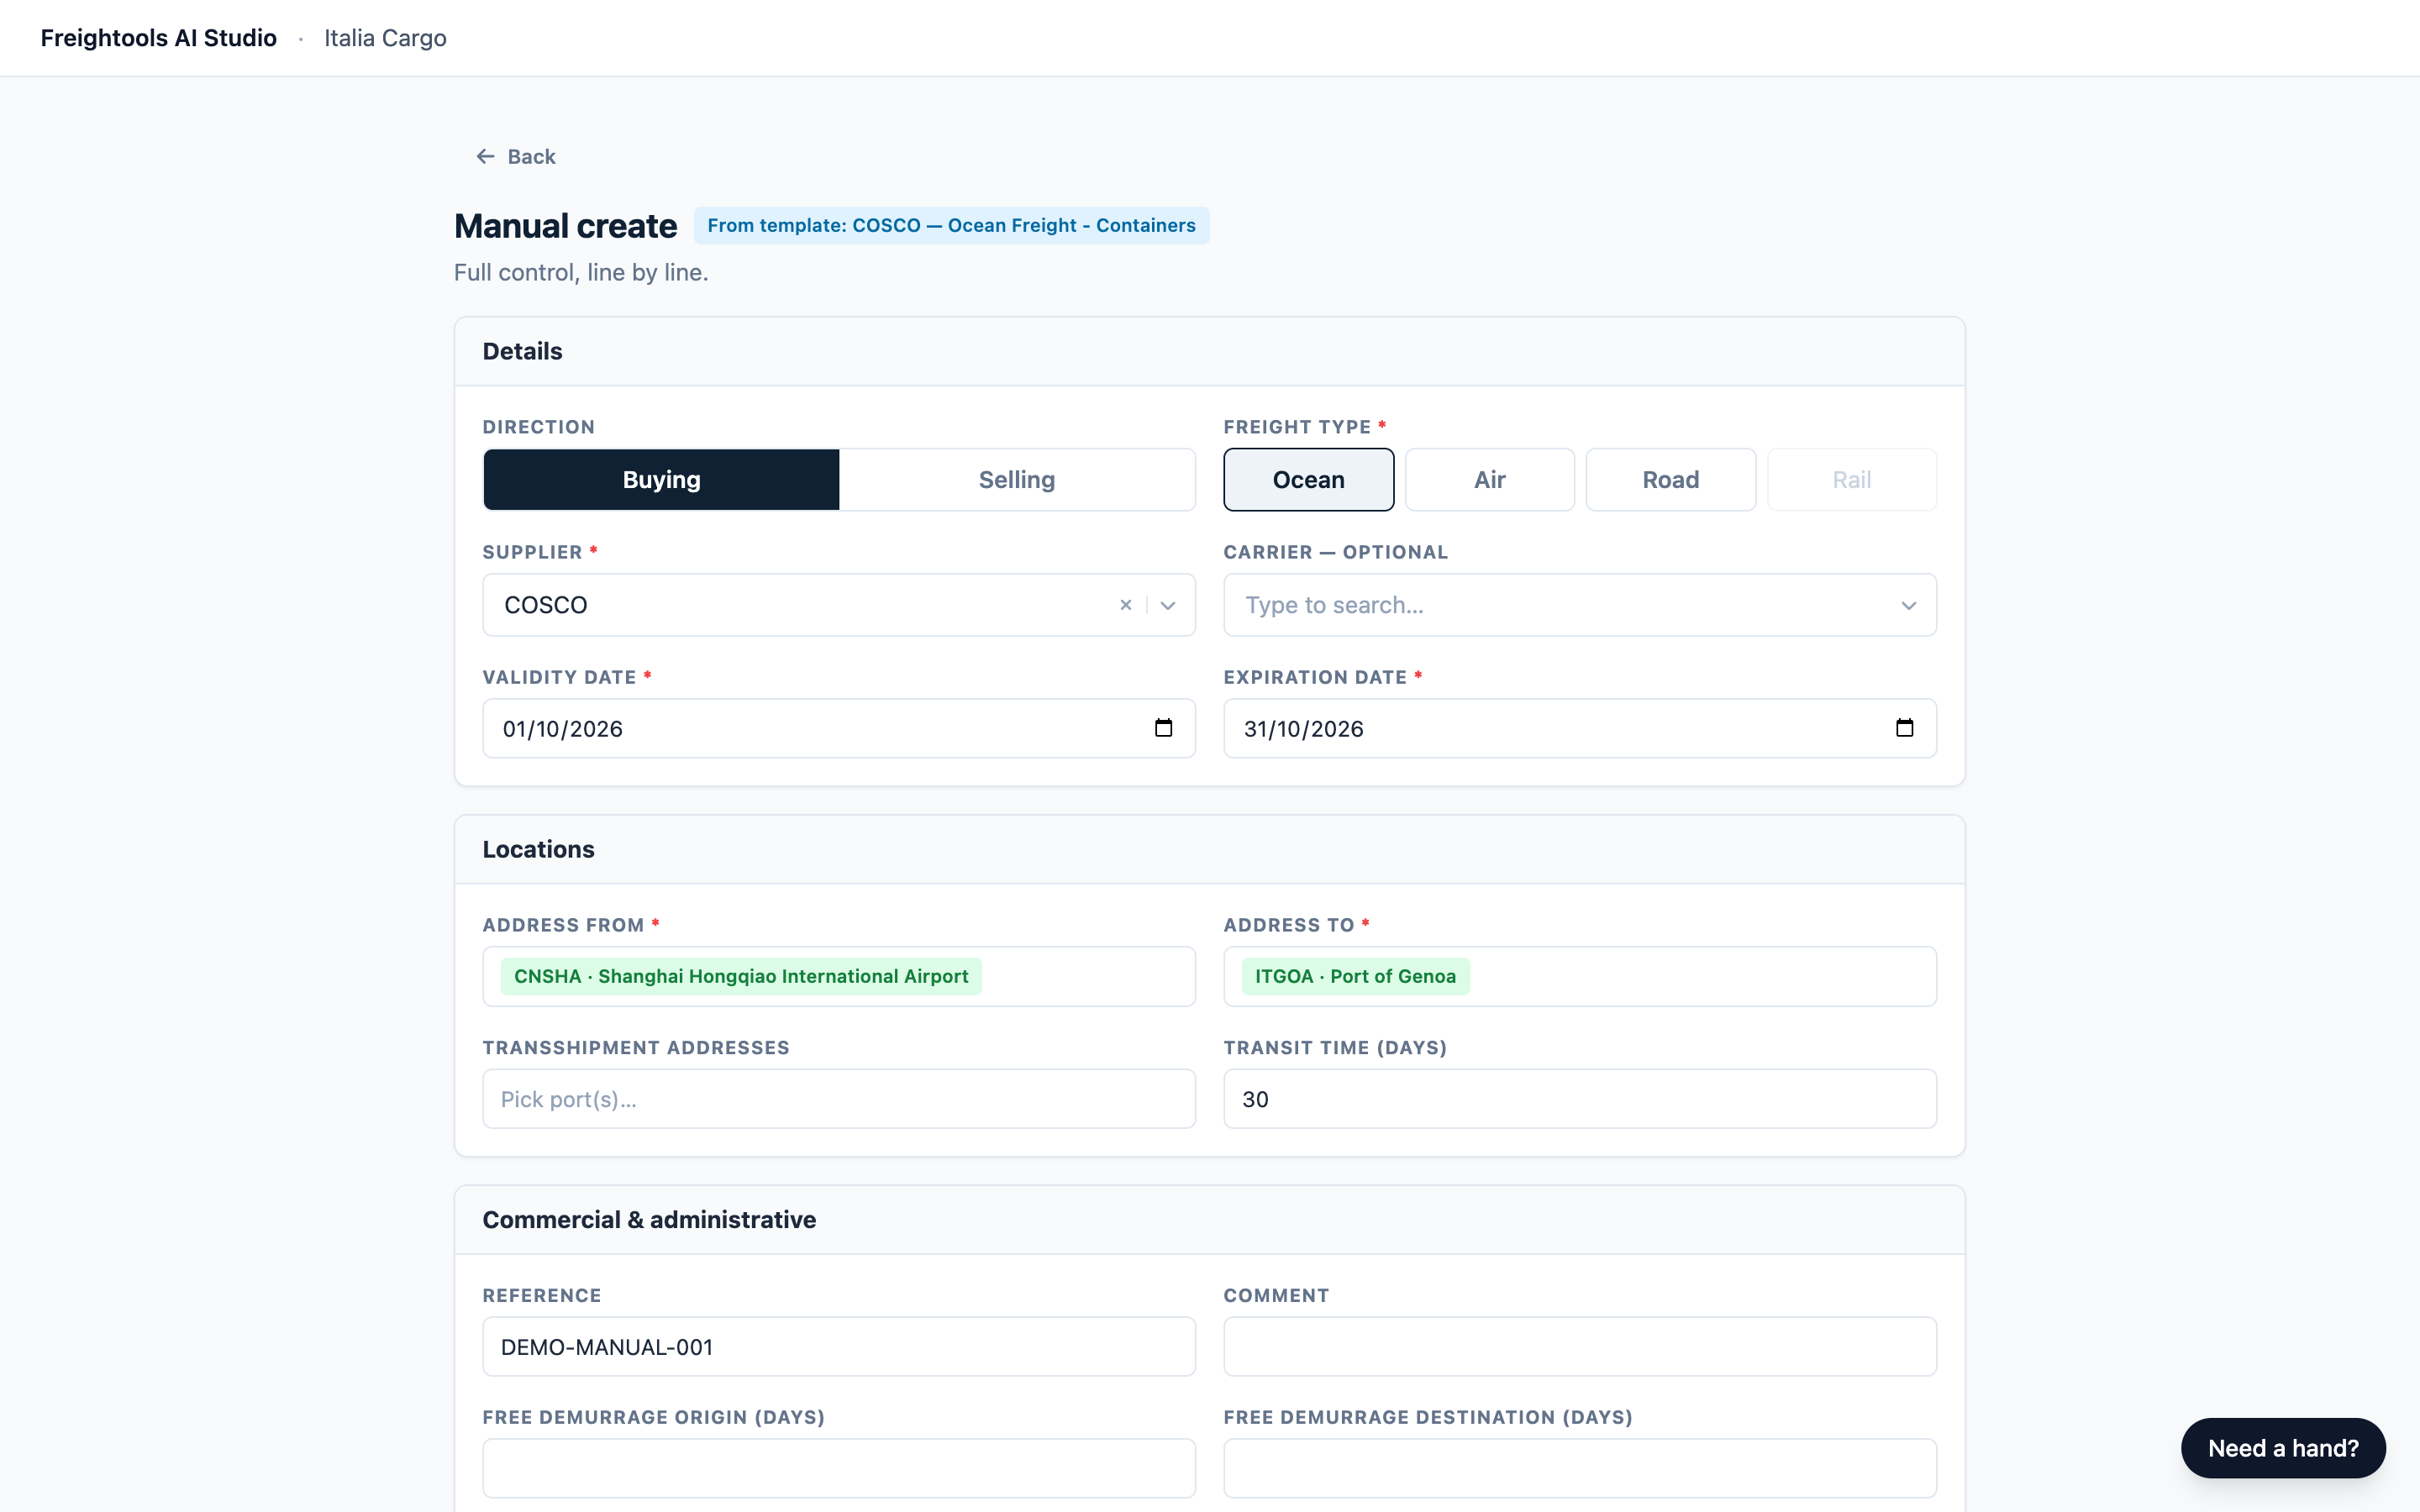
Important: A template keeps the dates, Reference and Comment from last time. Change Validity date and Expiration date, or the new agreement gets the old dates.
Creating from a template updates that template. To keep a separate template, start again from the Manual create card. To rename or archive, see Saved configurations and loading a new file for a supplier.
Troubleshooting
| Symptom | What to do |
|---|---|
| The supplier list says "No matches." for a supplier you know | Check that Buying is selected and that the partner is an active supplier in Freightools. On a brand-new studio link, wait a few minutes and reload the page. |
| Price detail… and Evaluation type… are empty, or the currency shows only "Curr…" | The lists didn't load. Reload the page and fill in the form again. |
| An activity or charge you know isn't listed | Type part of its name to narrow the list. If it still doesn't appear, ask your Freightools administrator to check it in Freightools. |
| After Create agreement, a message starts "The form has a problem —" | Nothing was created. Go Back to the form, shorten what you typed or remove some entries, and create again. |
| Anything else | Don't click Create agreement again. Look in Freightools at the supplier's buying agreements to see whether it was created, then send the message you saw to your Freightools contact. |