
A buying agreement records what one supplier charges you on one route. This article covers typing an ocean agreement in by hand on the Basic Information tab of the Create Buying Agreement form, from the classification at the top to the spot details at the bottom.
Nothing on this tab sets a price. The rates and charges go on the second tab of the same window, Activity Details — see How to add or edit rates and charges in a buying agreement.
Before you start
- Have the supplier's rate in front of you: the carrier it is for, the origin and destination it covers, and the dates it is good for.
- Carrier opens a search box you type into.
- If the form itself misbehaves — a list that never loads, a save that never finishes — that is one for your Freightools contact.
Open the form
- The Create Buying Agreement form opens on top of the buying agreements list, with that list's Quick Filters panel greyed out behind it. It opens on Basic Information.
- The header stays put while the body of the form scrolls, so Basic Information, Activity Details, Files and Emails, History, Save and the × that closes the form are in reach from any section.
Classify the agreement
Under Classification:
- Set Type. For a freight rate this is Freight.
- Set Freight type. For a sea freight rate this is Ocean.
Both carry a red *, so the form isn't complete without them. Each field carries an × and a caret at its right-hand end.
Fill in the details
Under Details:
- Click Supplier and pick the company whose rate this is. It is required.
- Click Carrier ("Search carrier…"), type in the search box that opens, and click the carrier. It carries no red *, so you can leave it empty for a rate that isn't tied to one line.
- Check Validity date and Expiration date. Each holds a date and carries a calendar button at the right of the field. Both are shown day/month/year, so
16/09/2026is 16 September — read the middle number before you trust a date.
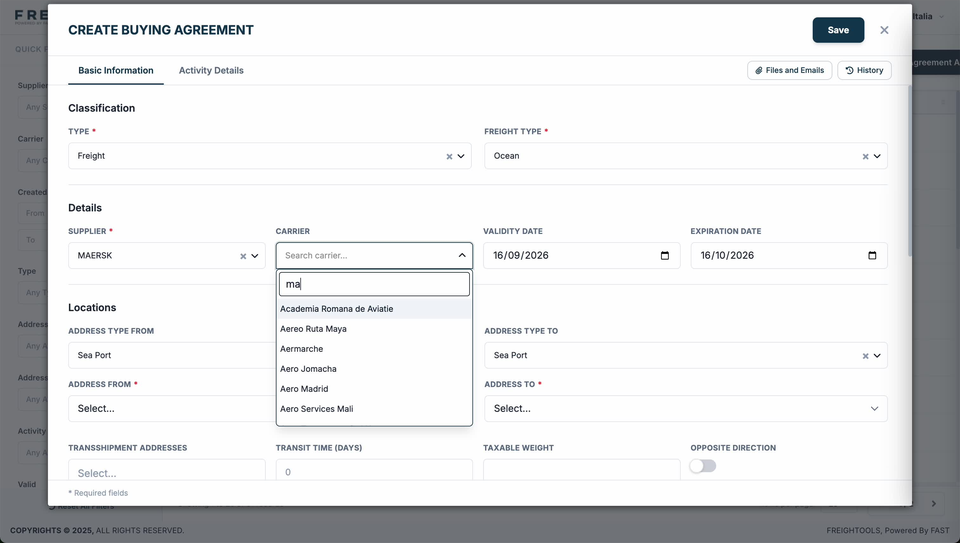
When you buy directly from the shipping line, Supplier and Carrier hold the same company.
Note: What you type can match anywhere in a carrier's name, not only at the start — typing "ma" brings back names such as "Aereo Ruta Maya", "Aermarche" and "Aero Madrid".
Set the route under Locations
The route is set in two moves: first the kind of place, then the place itself.
- Check Address type from and Address type to. For a port-to-port ocean rate both read Sea Port.
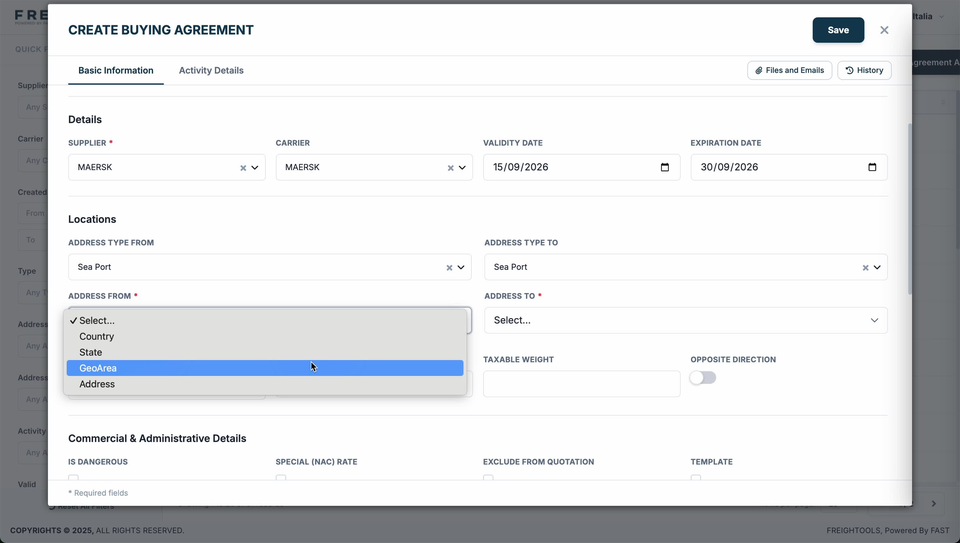
- Open Address from and pick how precisely you want to name the origin: Country, State, GeoArea or Address. This field is required.
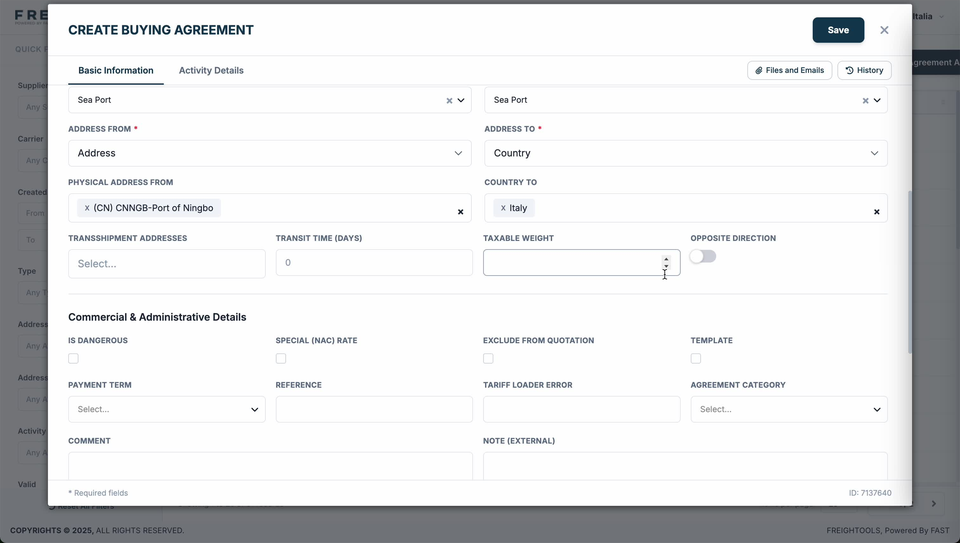
- A picker appears underneath, named after the level you chose. Choosing Address gives Physical address from, where the place you pick sits in the field as a chip — "(CN) CNNGB-Port of Ningbo". The chip carries an ×, and there is a second × at the right-hand end of the field.
- Do the same on Address to, also required. Choosing Country turns the second field into Country to, which takes a whole country as destination rather than one named port.
- Add Transshipment addresses ("Select…") if the rate routes via another port, and Transit time (days), which shows a grey 0 in an empty field.
- Taxable weight and the Opposite direction toggle sit on the same row. Leave them as they are unless you know you need them.
Add commercial and administrative details
None of the fields under Commercial & Administrative Details carry a red *, so the agreement saves without them. Fill in the ones your office works with:
- Is dangerous, Special (NAC) rate, Exclude from quotation and Template — four checkboxes on one row, all clear on a new agreement.
- Payment term and Agreement category — lists, both showing "Select…".
- Reference and External ID — single-line boxes, both empty on a new agreement.
- Comment and Note (external) — two larger text boxes.
- Tariff loader error — a single-line box, empty on a new agreement.
Fill in the spot details
Spot Details describes one sailing:
- Vessel — a list ("Select vessel…").
- Voyage — free text.
- Estimated departure date, Estimated arrival date and Estimated cutoff date — all three take dd/mm/yyyy.
- Free demurrage origin days and Free demurrage destination days — free demurrage days at each end of the route. Both show a grey 0 in an empty field.
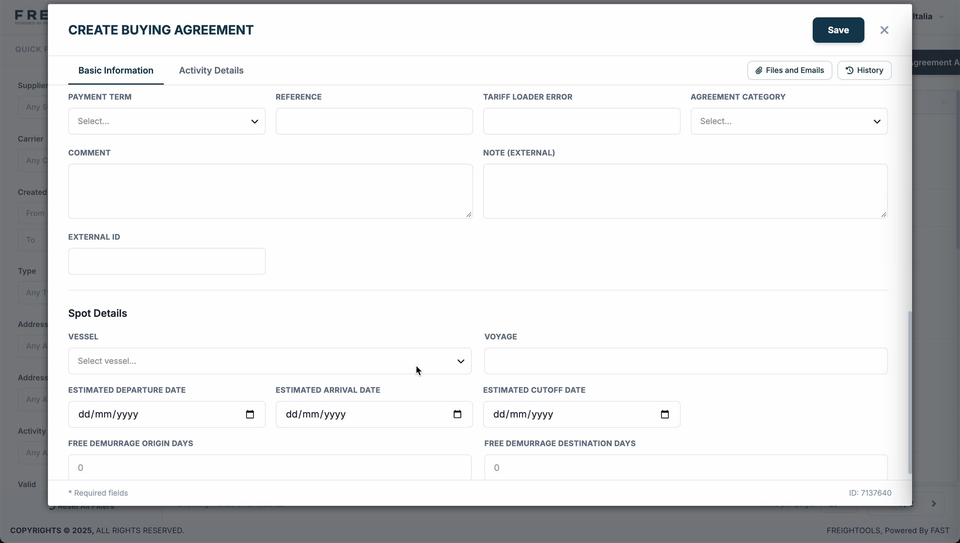
Fill this section in when the supplier quoted you against a named sailing, and leave it empty when the rate isn't tied to one.
Save the agreement
Basic Information describes the agreement and sets no prices; the rates go on Activity Details, the other tab of this same window. There is one Save, at the top right above the tabs, and it is the same button on both tabs — see How to add or edit rates and charges in a buying agreement.
- Check the fields marked with a red *: Type, Freight type, Supplier, Address from and Address to. The reminder "* Required fields" sits at the bottom left of the form.
- Click Save.
If something goes wrong
| You see | What to do |
|---|---|
| No place picker under Address from or Address to | Pick the level first — Country, State, GeoArea or Address. The picker only appears underneath once you have chosen. |
| The carrier you typed isn't at the top of the list | The letters you type can match in the middle of a name, not only at the start, so read the results for a name you weren't expecting. If the carrier genuinely isn't there, ask your Freightools contact. |
| The supplier you want isn't listed | Adding a new company is a job for your Freightools contact. |
| A date reads as the wrong day | The form uses day/month/year, so 16/09/2026 is 16 September. Re-enter it, and check Validity date and Expiration date together before you save. |
Related articles
- Understanding buying agreements
- How to add or edit rates and charges in a buying agreement
- Where Instant Quote prices come from
- Why a buying agreement is not available in Instant Quote